How to do the Clearer effect in Vegas

In this tutorial, we will learn how to make Clearer effect in Vegas Application.
If you prefer a video tutorial, you can just go to this link -> Youtube Clearer Tutorial

Step 1:
Open Vegas application, then import your video.
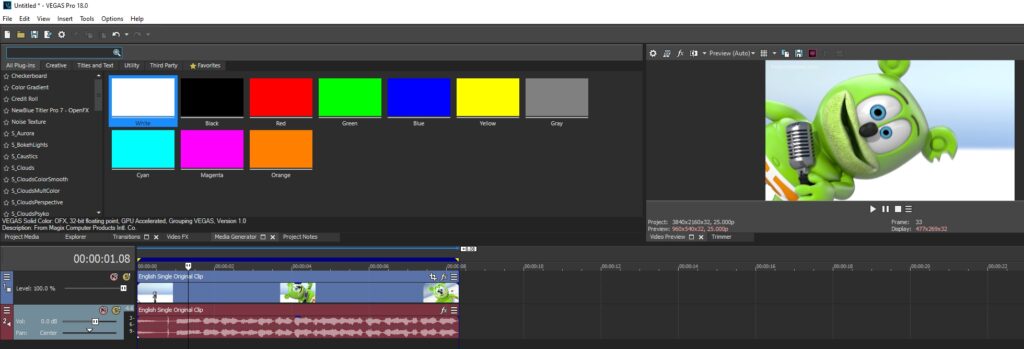
Import video

Step 2:
Go to video section and click fx symbol. As an alternate way, you can just right click the video and choose Media fx.

Click fx symbol

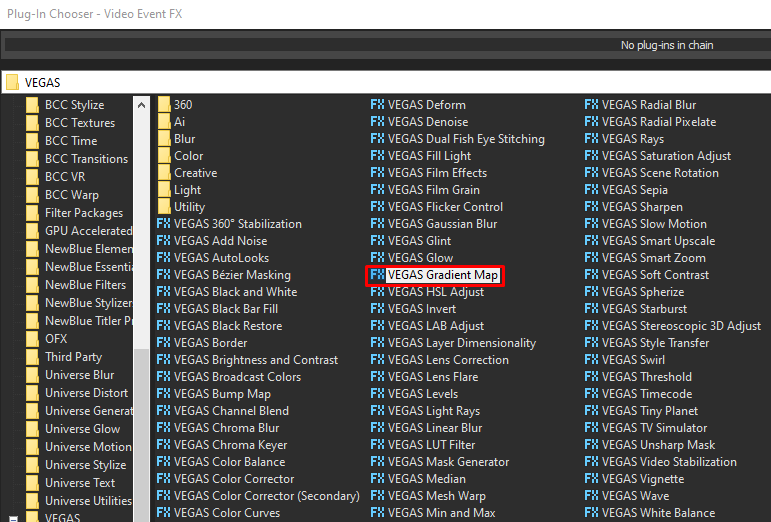
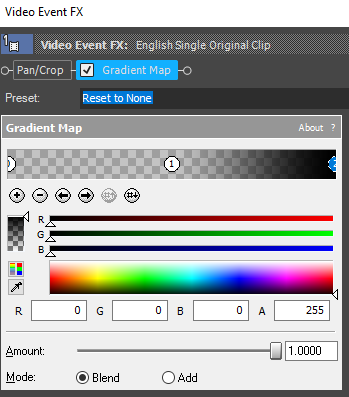
Step 3: Choose Gradient Map in the list of effects.

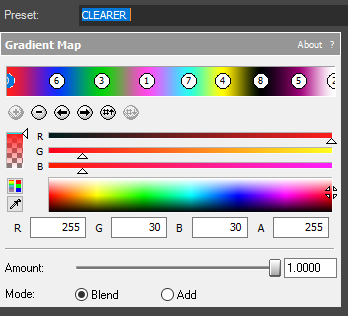
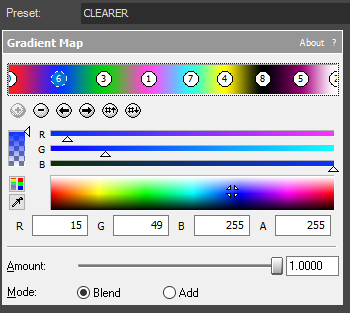
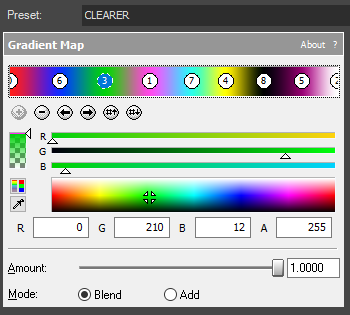
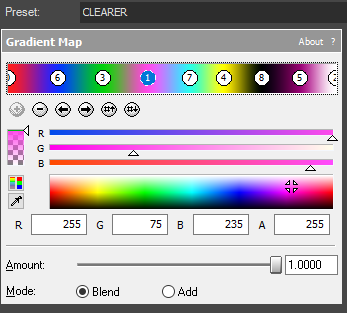
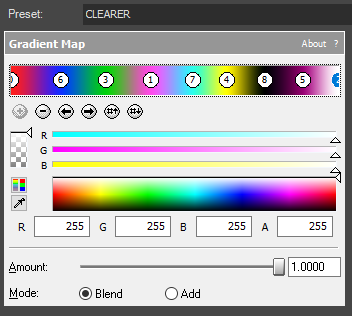
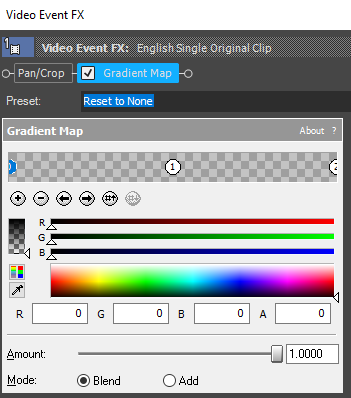
Step 4: Customize the gradients using the following settings.

1st Gradient:

R -> 255G -> 30B -> 30A -> 255

2nd Gradient:

R -> 15G -> 49B -> 255A -> 255

3rd Gradient:

R -> 0G -> 210B -> 12A -> 255

4th Gradient:

R -> 255G -> 75B -> 235A -> 255

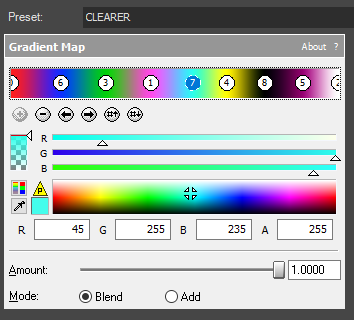
5th Gradient:

R -> 45G -> 255B -> 235A -> 255

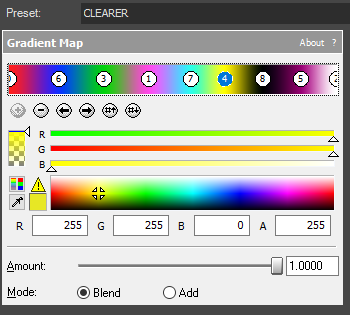
6th Gradient:

R -> 255G -> 255B -> 0A -> 255

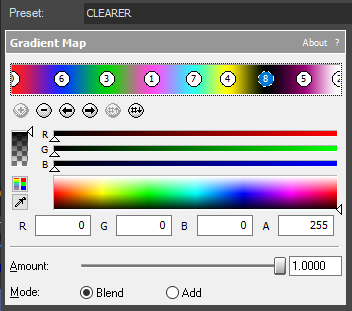
7th Gradient:

R -> 0G -> 0B -> 0A -> 255

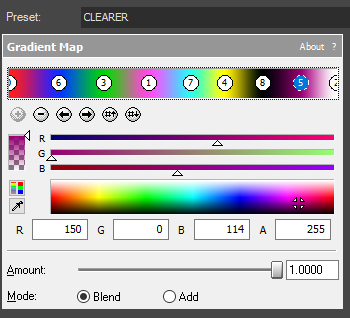
8th Gradient:

R -> 150G -> 0B -> 114A -> 255

9th Gradient:

R -> 255G -> 255B -> 255A -> 255

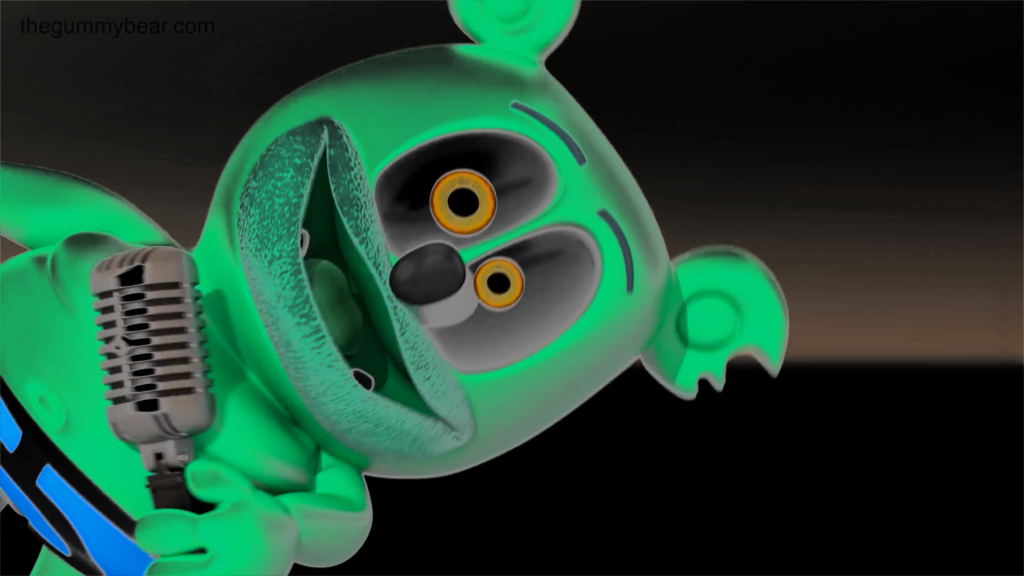
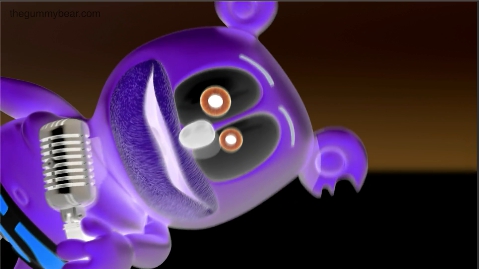
That’s it for the video effect, if you are using Gummy Bear as reference, it should look like this

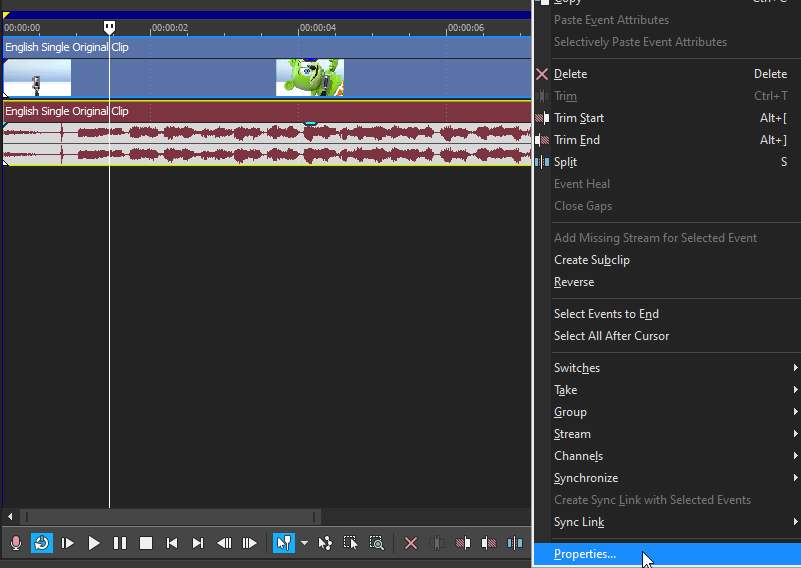
Step 5: Go to audio section and click fx symbol. As an alternate way, you can just right click the audio and choose Audio Event fx.

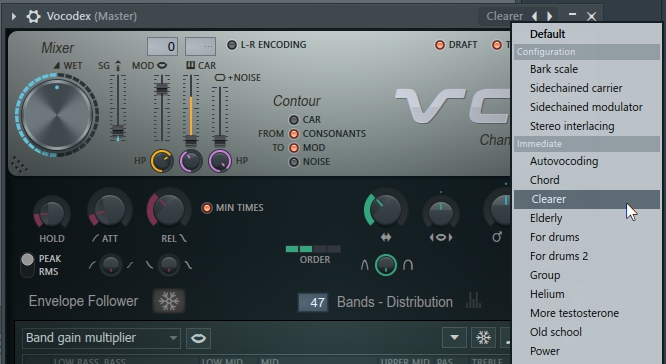
Step 6: Add IL Vocodex effect, I am using FL Studio but they should look the same.

Step 7: In the list of Presets, choose Clearer.

Step 8: Piano keys should look like this.
14th, 16th White keys
Type: Ensemble

Step 9: Render the video, you have successfully made the Clearer Effect.
Here are my videos in Clearer effect.

If you find this tutorial very helpful, please feel free to share it.
You can also find me in Youtube -> Team Bahay

How to do the Chorded effect in Vegas

In this tutorial, we will learn how to make Chorded effect in Vegas Application.
If you prefer a video tutorial, you can just go to this link -> Youtube Chorded Tutorial

Step 1:
Open Vegas application, then import your video.

Import video

Step 2:
Go to video section and click fx symbol. As an alternate way, you can just right click the video and choose Media fx.

Click fx symbol

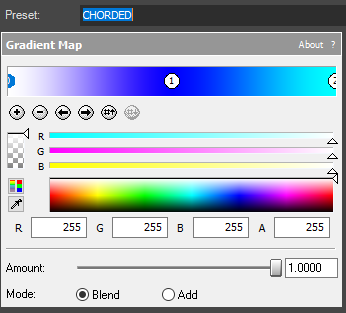
Step 3: Choose Gradient Map in the list of effects.
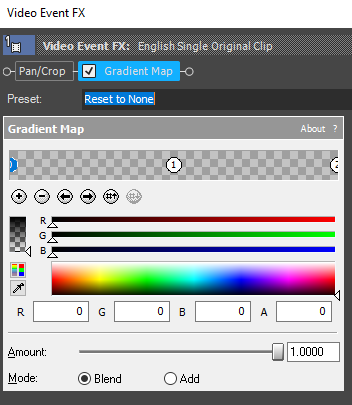
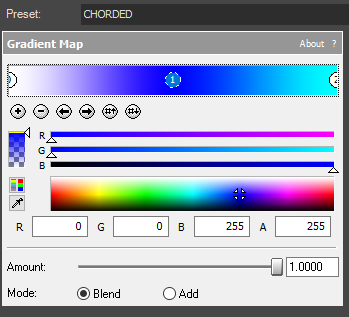
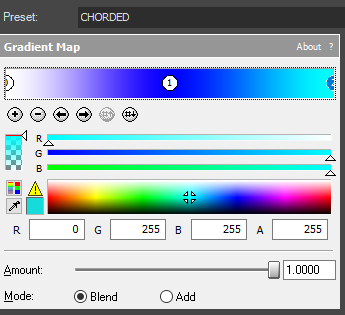
Step 4: Customize the gradients using the following settings.
1st Gradient:

R -> 255G -> 255B -> 255A -> 255

2nd Gradient

R-> 0G -> 0B -> 255A -> 255

3rd Gradient

R-> 0G -> 255B -> 255A -> 255

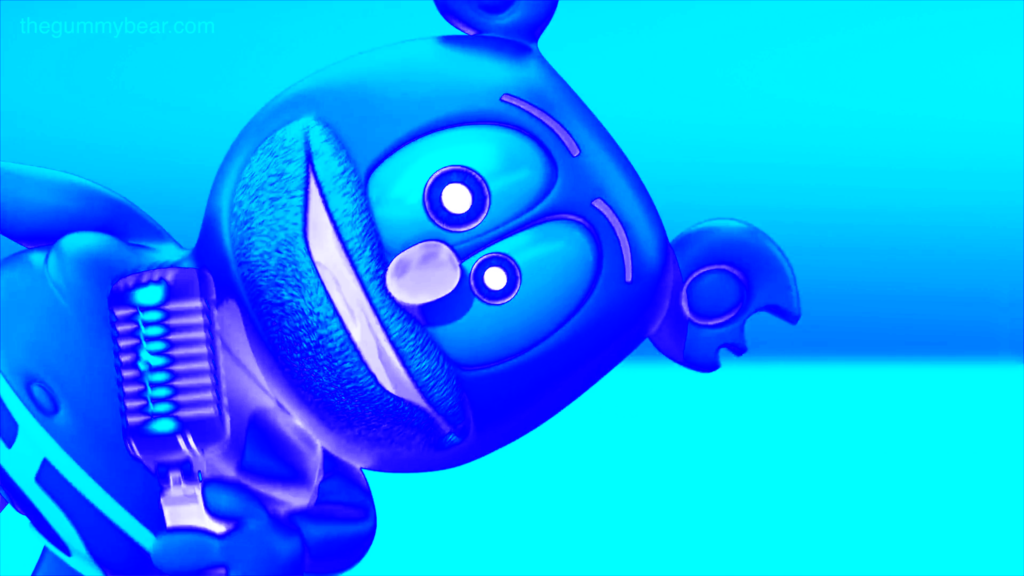
That’s it for the video effect, if you are using Gummy Bear as reference, it should look like this
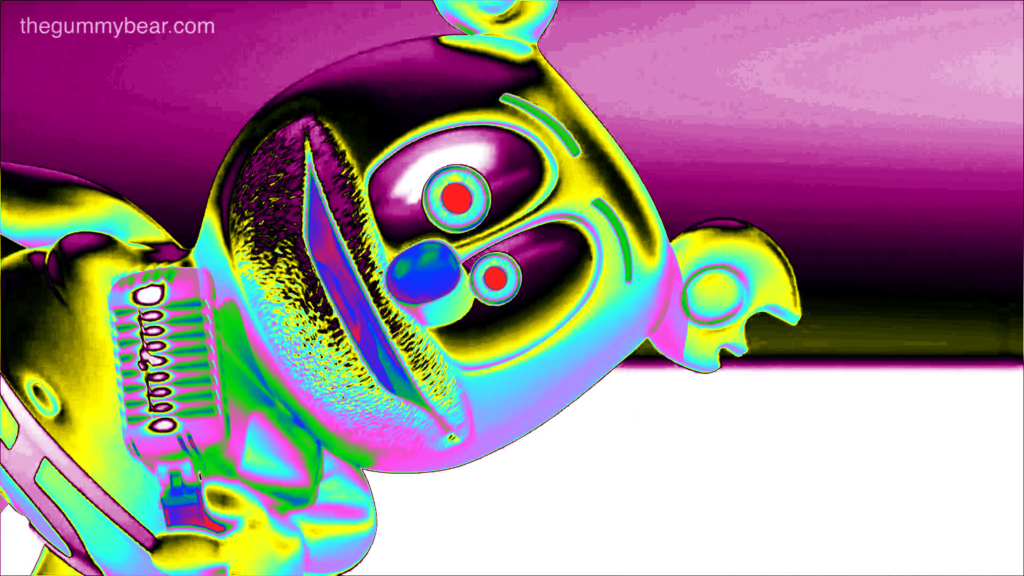
Step 5: Go to audio section and click fx symbol. As an alternate way, you can just right click the audio and choose Audio Event fx.

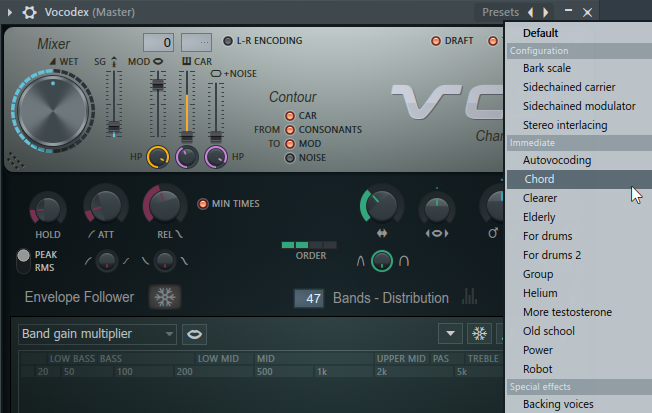
Step 6: Add IL Vocodex effect, I am using FL Studio but they should look the same.

Step 7: In the list of Presets, choose Chord.

Step 8: Piano keys should look like this.
12th, 18th, 23rd White keys
Type: PWM

Step 9: Render the video, you have successfully made the Chorded Effect.
Here are my videos in Chorded effect.

If you find this tutorial very helpful, please feel free to share it.
You can also find me in Youtube -> Team Bahay

How to do the TeamBahayChorded effect in Vegas

In this tutorial, we will learn how to make my Team Bahay Chorded / TeamBahayChorded effect in Vegas Application.
If you prefer a video tutorial, you can just go to this link -> Youtube TeamBahayChorded Tutorial

Step 1:
Open Vegas application, then import your video.

Import video

Step 2:
Go to video section and click fx symbol. As an alternate way, you can just right click the video and choose Media fx.

Click fx symbol

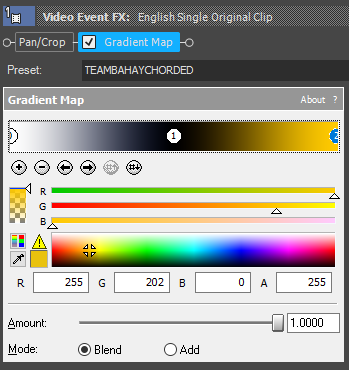
Step 3: Choose Gradient Map in the list of effects.

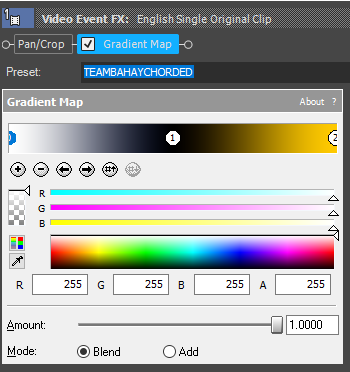
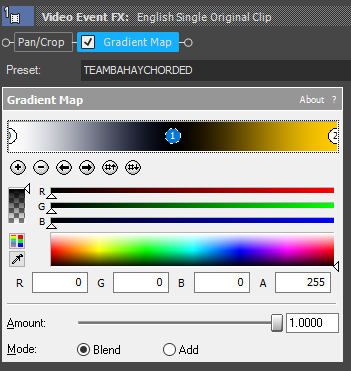
Step 4: Customize the gradients using the following settings.
1st Gradient:

R -> 255G -> 255B -> 255A -> 255

2nd Gradient

R-> 0G -> 0B -> 0A -> 255

3rd Gradient

R-> 255G -> 202B -> 0A -> 255

That’s it for the video effect, if you are using Gummy Bear as reference, it should look like this

Step 5: Go to audio section and click fx symbol. As an alternate way, you can just right click the audio and choose Audio Event fx.

Step 6: Add IL Vocodex effect, I am using FL Studio but they should look the same.
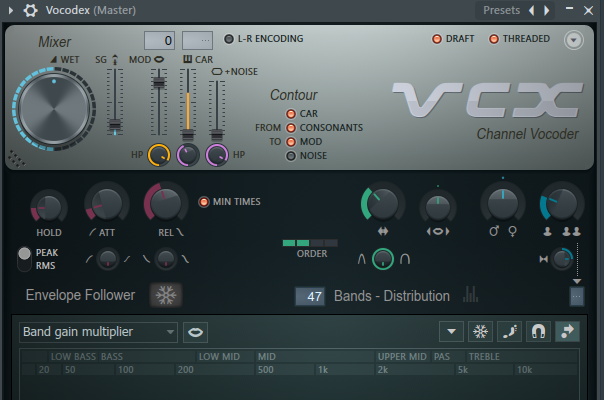
Step 7: In the list of Presets, choose Chord.

Step 8: Follow the Piano keys in the image below.
12th, 15th, 18th Black keys

Step 9: Render the video, you have successfully made the TeamBahayChorded Effect.
Here are my videos in TeamBahayChorded effect.

If you find this tutorial very helpful, please feel free to share it.
You can also find me in Youtube -> Team Bahay

How to do the G Major 13 effect in Vegas

In this tutorial, we will learn how to make G Major 13 in Vegas Application.
If you prefer a video tutorial, you can just go to this link -> Youtube G Major 13 Tutorial

Step 1:
Open Vegas application, then import your video.

Import video

Step 2:
Go to video section and click fx symbol. As an alternate way, you can just right click the video and choose Media fx.

Click fx symbol

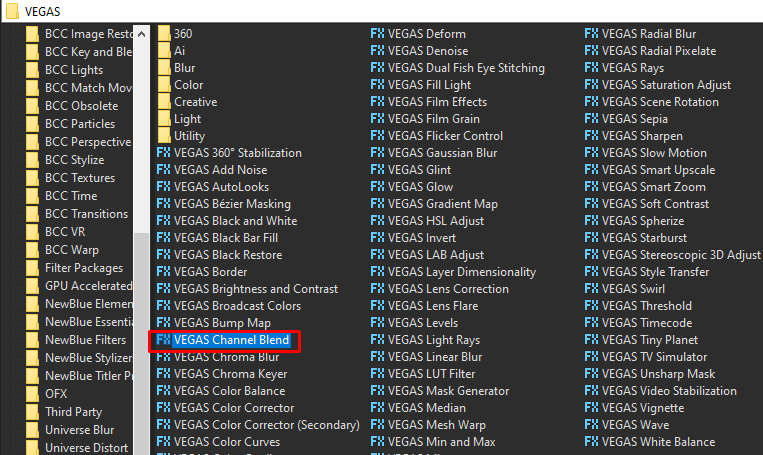
Step 3: Choose Channel Blend in the list of effects.

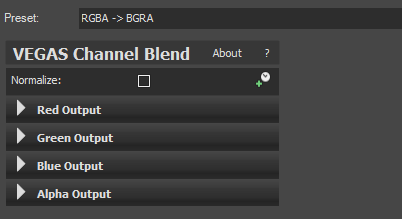
Step 4: In the list of Presets, choose RGBA -> BGRA

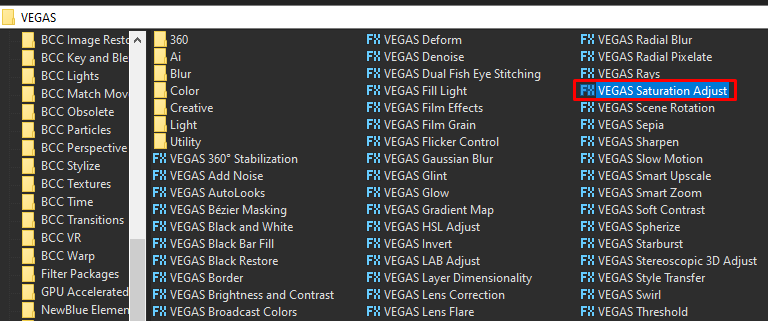
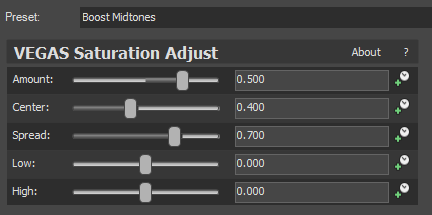
Step 5: Add 2nd effect Saturation Adjust.

Step 6: In the list of presets for Saturation Adjust, select Boost Midtones.

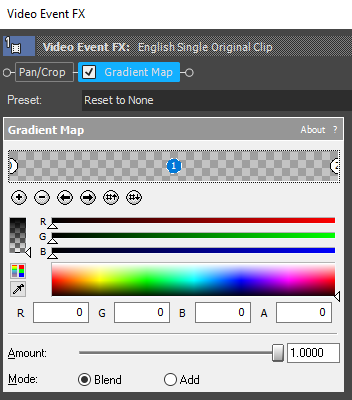
Step 7: Add another effect Gradient Map.

Step 8:
Customize the gradients using the following settings.
1st Gradient:

R -> 0G -> 0B -> 0A -> 0

2nd Gradient

R-> 0G -> 0B -> 0A -> 0

3rd Gradient

R-> 0G -> 0B -> 0A -> 255

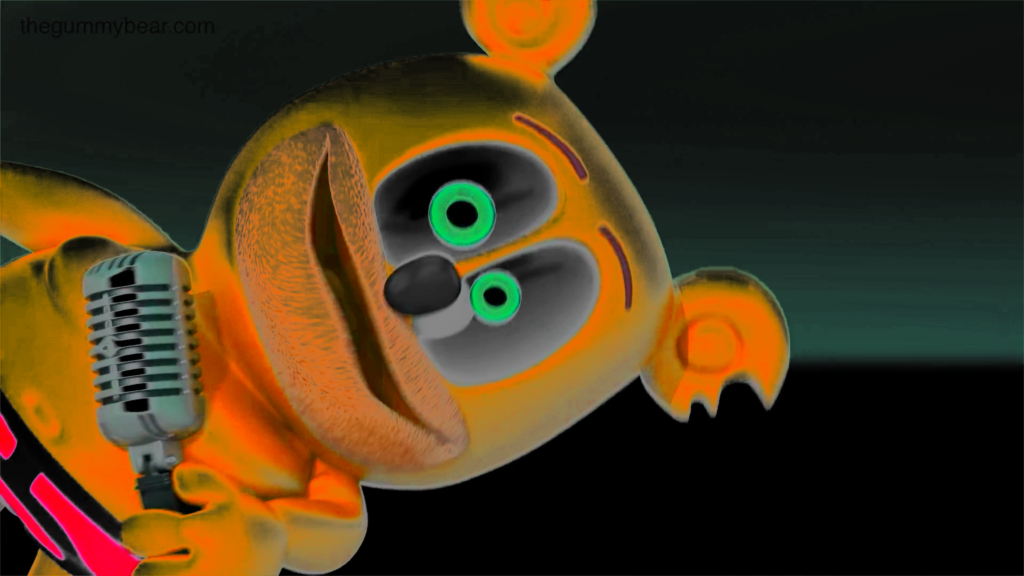
That’s it for the video effect, if you are using Gummy Bear as reference, it should look like this

Step 9: For the audio part, right click audio, then choose Properties.

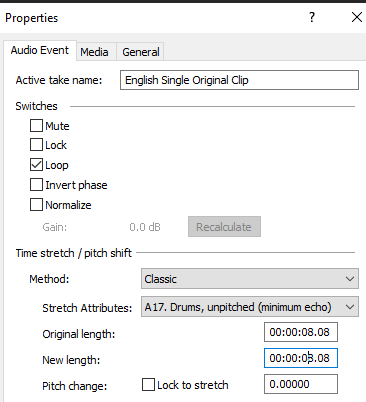
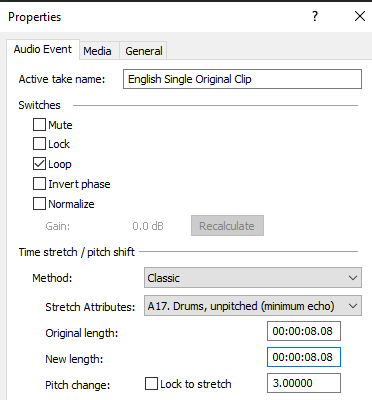
Step 10: In the popup window, change the following:
Method: Classic
Stretch Attributes: A17. Drums, unpitched (minimum echo)
Pitch Change: 0.00

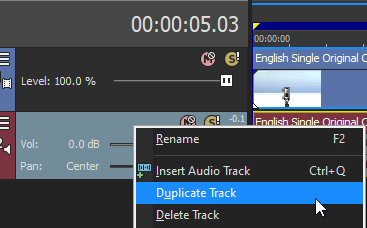
Step 11: Go to your audio again and right click it, then choose Duplicate track

Step 12: Change the pitch of the new audio with the following:

Method: Classic
Stretch Attributes: A17. Drums, unpitched (minimum echo)
Pitch Change: 3.00

Step 13: Do Step 11 and 12 three more times with the following pitches

Method: Classic
Stretch Attributes: A17. Drums, unpitched (minimum echo)
Pitch Change: 6.00

Method: Classic
Stretch Attributes: A17. Drums, unpitched (minimum echo)
Pitch Change: 9.00

Method: Classic
Stretch Attributes: A17. Drums, unpitched (minimum echo)
Pitch Change: 12.00

Step 13: Render the video, you have successfully made the G Major 13 Effect.
Here is my video in G Major 13 effect.

If you find this tutorial very helpful, please feel free to share it.
You can also find me in Youtube -> Team Bahay
How to do the G Major 12 effect in Vegas

In this tutorial, we will learn how to make G Major 12 in Vegas Application.
If you prefer a video tutorial, you can just go to this link -> Youtube G Major 12 Tutorial

Step 1:
Open Vegas application, then import your video.

Import video

Step 2:
Go to video section and click fx symbol. As an alternate way, you can just right click the video and choose Media fx.

Click fx symbol

Step 3:
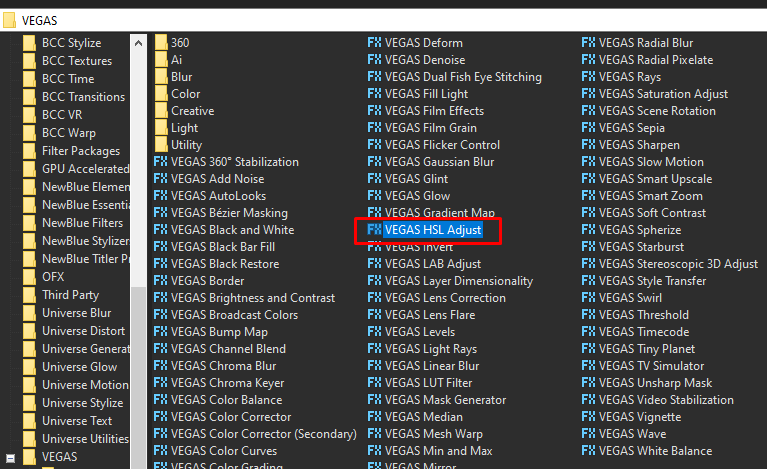
Choose HSL Adjust in the list of effects.

Step 4: Set Hue to 0.8500

Step 5: Add another HSL Adjust for your 2nd effect.

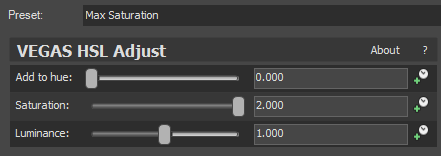
Step 6: In the list of presets, choose Max Saturation.

Step 7: Add another effect Gradient Map.

Step 8:
Customize the gradients using the following settings.
1st Gradient:

R -> 0G -> 0B -> 0A -> 0

2nd Gradient

R-> 0G -> 0B -> 0A -> 0

3rd Gradient

R-> 0G -> 0B -> 0A -> 255

That’s it for the video effect, if you are using Gummy Bear as reference, it should look like this

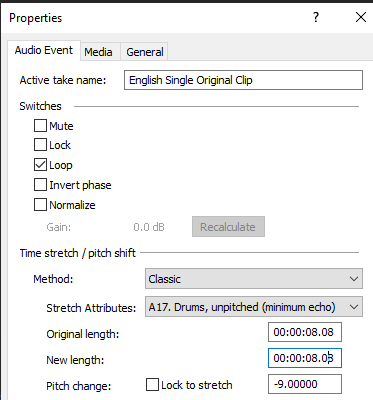
Step 9: For the audio part, right click audio, then choose Properties.

Step 10: In the popup window, change the following:
Method: Classic
Stretch Attributes: A17. Drums, unpitched (minimum echo)
Pitch Change: -9.00

Step 11: Go to your audio again and right click it, then choose Duplicate track

Step 12: Change the pitch of the new audio with the following:

Method: Classic
Stretch Attributes: A17. Drums, unpitched (minimum echo)
Pitch Change: -2.00

Step 13: Do Step 11 and 12 four more times with the following pitches

Method: Classic
Stretch Attributes: A17. Drums, unpitched (minimum echo)
Pitch Change: 3.00

Method: Classic
Stretch Attributes: A17. Drums, unpitched (minimum echo)
Pitch Change: 7.00

Method: Classic
Stretch Attributes: A17. Drums, unpitched (minimum echo)
Pitch Change: 10.00

Method: Classic
Stretch Attributes: A17. Drums, unpitched (minimum echo)
Pitch Change: 15.00

Step 13: Render the video, you have successfully made the G Major 12 Effect.
Here is my video in G Major 12 effect.

If you find this tutorial very helpful, please feel free to share it.
You can also find me in Youtube -> Team Bahay
How to do the G Major 11 effect in Vegas

In this tutorial, we will learn how to make G Major 11 in Vegas Application.
If you prefer a video tutorial, you can just go to this link -> Youtube G Major 11 Tutorial

Step 1:
Open Vegas application, then import your video.

Import video

Step 2:
Go to video section and click fx symbol. As an alternate way, you can just right click the video and choose Media fx.

Click fx symbol

Step 3:
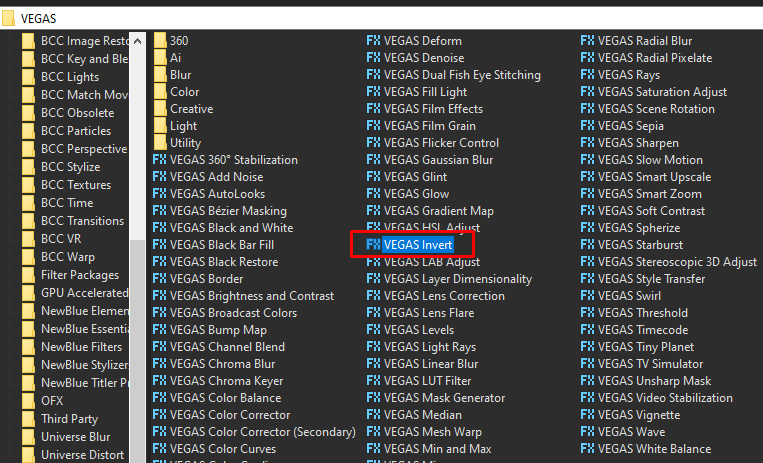
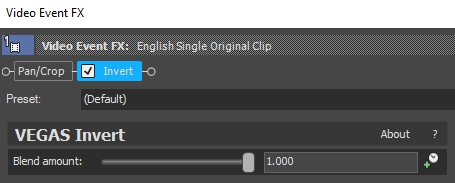
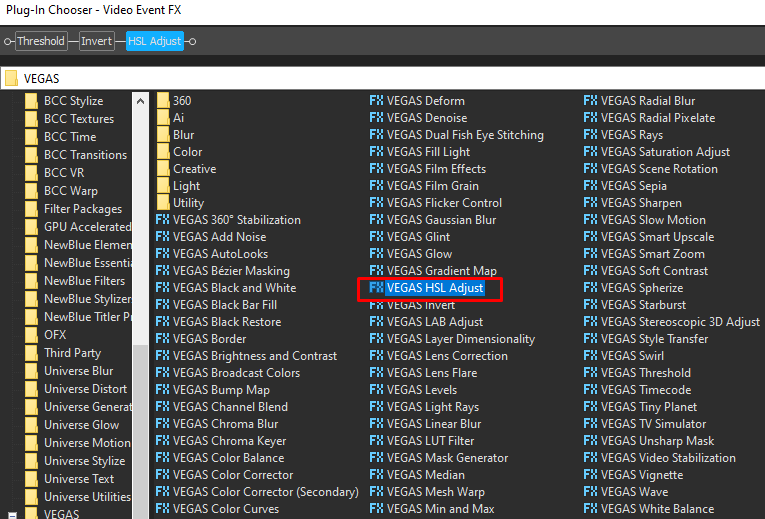
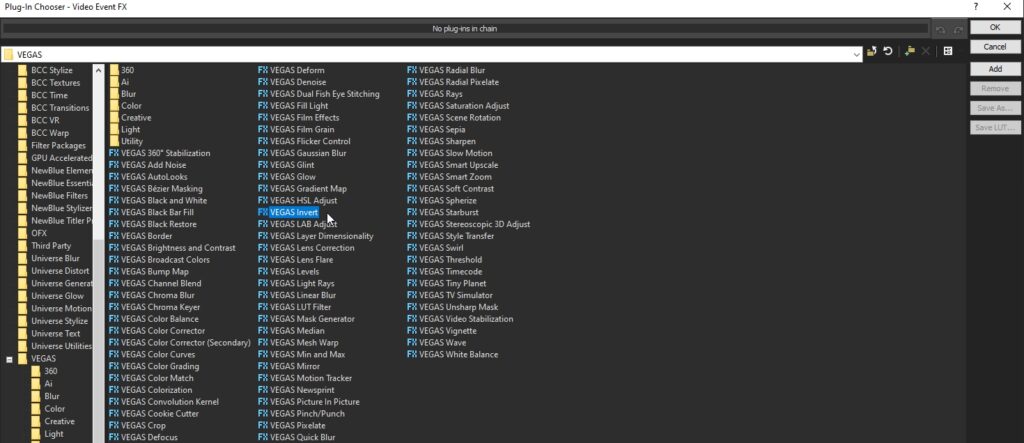
Choose Invert in the list of effects.

Step 4:
A popup will appear, set Blend amount to 1.000. You can also pick Default in the list of available Preset.

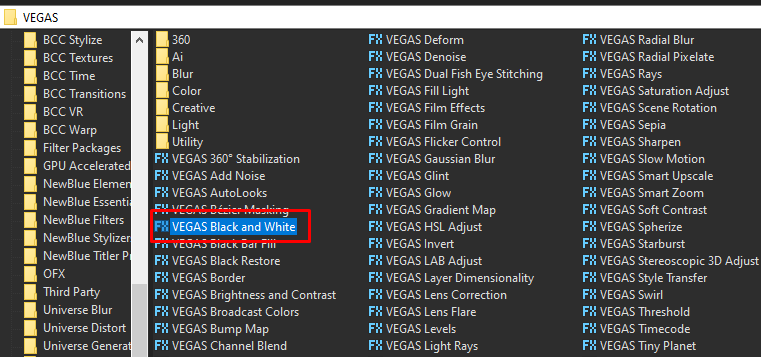
Step 5: Add the 2nd effect Black and White.

Step 6:

Set the Blend amount to 1.000, or you just choose the Default preset.

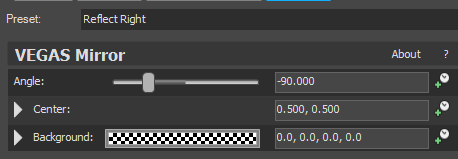
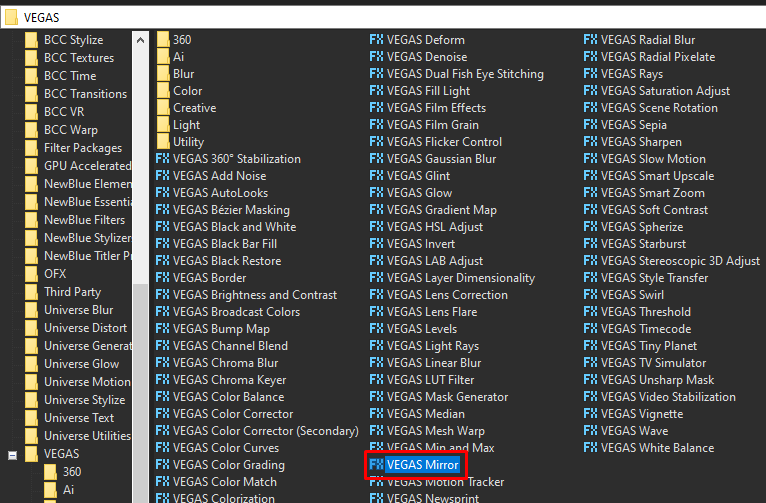
Step 7: For the 3rd and last video effect, add Mirror.

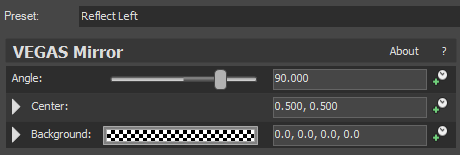
Step 8: Choose Reflect Right in the list of Presets.

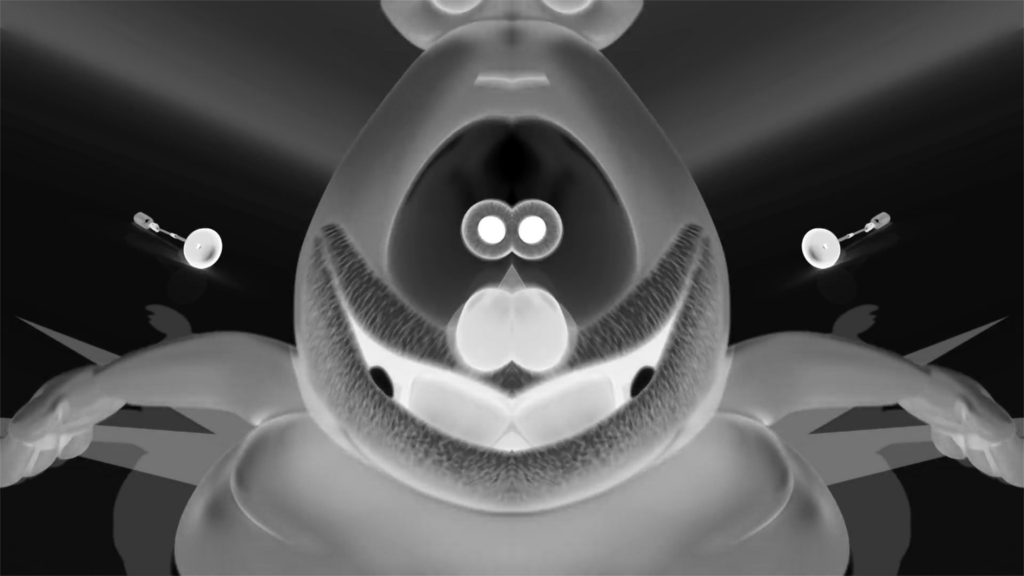
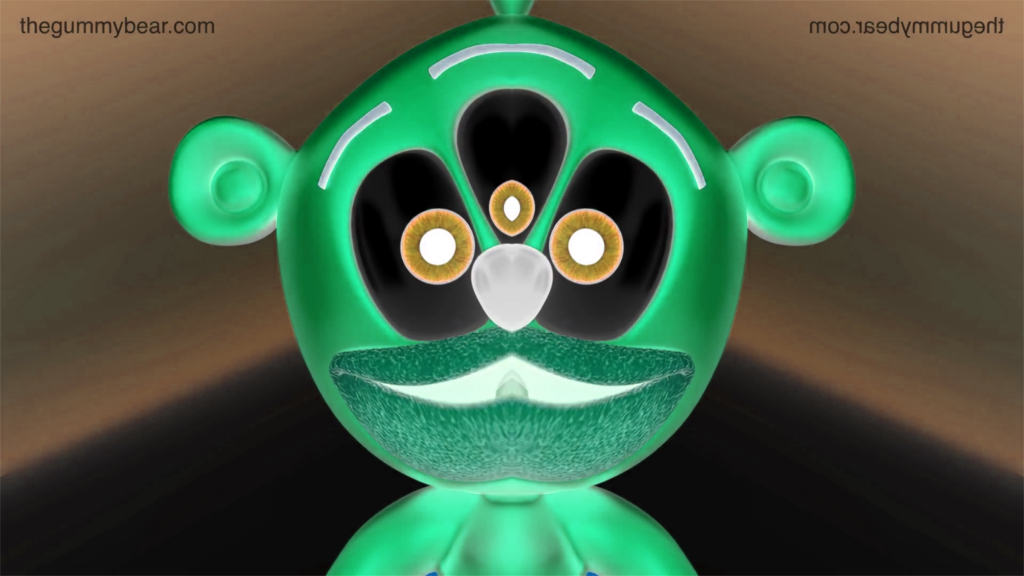
That’s it for the video effect, if you are using Gummy Bear as reference, it should look like this

Step 9: For the audio part, right click audio, then choose Properties.

Step 10:
Change the following in the popup window:
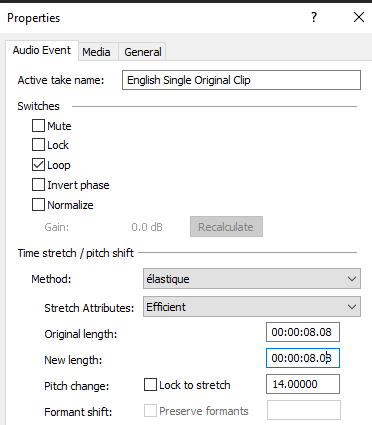
Method: elastique
Stretch Attributes: Efficient
Pitch Change: 14.000

Step 11:
Render the video, you have successfully made the G Major 11 Effect.
Here are my videos in G Major 11 effect.

If you find this tutorial very helpful, please feel free to share it.
You can also find me in Youtube -> Team Bahay
How to do the G Major 10 effect in Vegas

In this tutorial, we will learn how to make G Major 10 in Vegas Application.

Step 1:
Open Vegas application, then import your video.

Import video

Step 2:
Go to video section and click fx symbol. As an alternate way, you can just right click the video and choose Media fx.

Click fx symbol

Step 3:
Choose Invert in the list of effects.

Step 4: In the list of Presets for Invert, choose Default.
Blend Amount: 1.000

Step 5: Add another effect Channel Blend.

Step 6: In the list of Presets, choose RGBA -> BGRA

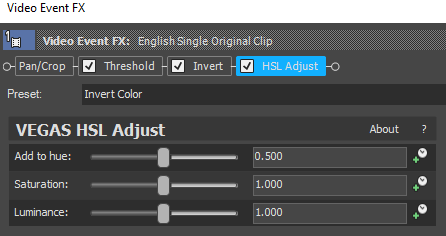
Step 6: Add the 3rd video effect HSL Adjust.

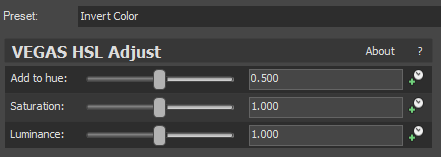
Step 7: In the list of Presets, choose Invert color or you can set
Add to hue -> 0.500

Step 8: For the 4th and last effect, add the Mirror effect.

Step 9: In the list of presets for Mirror, choose Reflect Left.


That’s it for the video effect, if you are using Gummy Bear as reference, it should look like this

Step 10: You need to render the audio of G Major 10 for 2 times.
1st Render – G Major audio, please refer to this tutorial.
If you don’t want to go over the tutorial, here are the pitches of the 1st render
Method: Classic
Stretch Attributes: A17

Pitches:
-12.00
-5.00
0
+4.00
+7.00
+12.00

Step 11: Render the G Major audio.
Step 12: Delete all audio clips in Vegas
2nd Render
Step 13: Insert your new audio clip (the 1st render)
Step 14: Duplicate the audio clip so you should have 2 audio clips
Step 15: Here are the pitches of the 2 audio clips
Method: Classic
Stretch Attributes: A17
Pitches:

-1.00
0

Step 16:
Render the video, you have successfully made the G Major 10 Effect.
Here is my video in G Major 10 effect.

If you find this tutorial very helpful, please feel free to share it.
You can also find me in Youtube -> Team Bahay
How to do the G Major 9 effect in Vegas

In this tutorial, we will learn how to make G Major 9 in Vegas Application.
If you prefer a video tutorial, you can just go to this link -> Youtube G Major 9 Tutorial

Step 1:
Open Vegas application, then import your video.

Import video

Step 2:
Go to video section and click fx symbol. As an alternate way, you can just right click the video and choose Media fx.

Click fx symbol

Step 3:
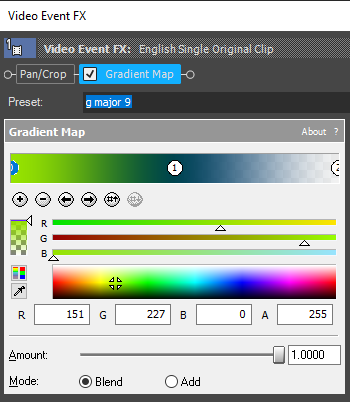
Choose Gradient Map in the list of effects.

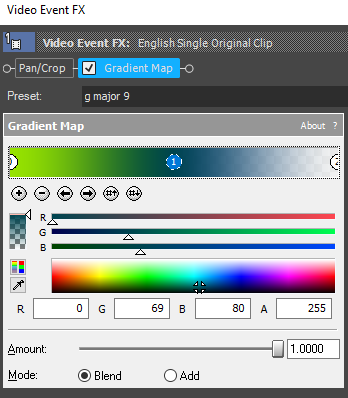
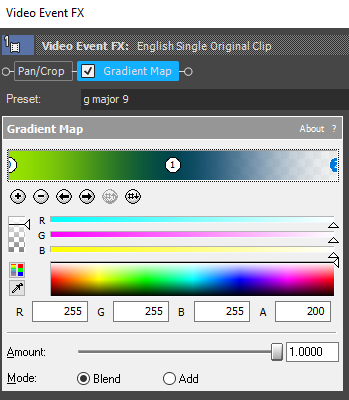
Step 4: Customize the gradients using the following settings.
1st Gradient:

R -> 151G -> 227B -> 0A -> 255

2nd Gradient

R-> 0G -> 69B -> 80A -> 255

3rd Gradient

R-> 255G -> 255B -> 255A -> 200

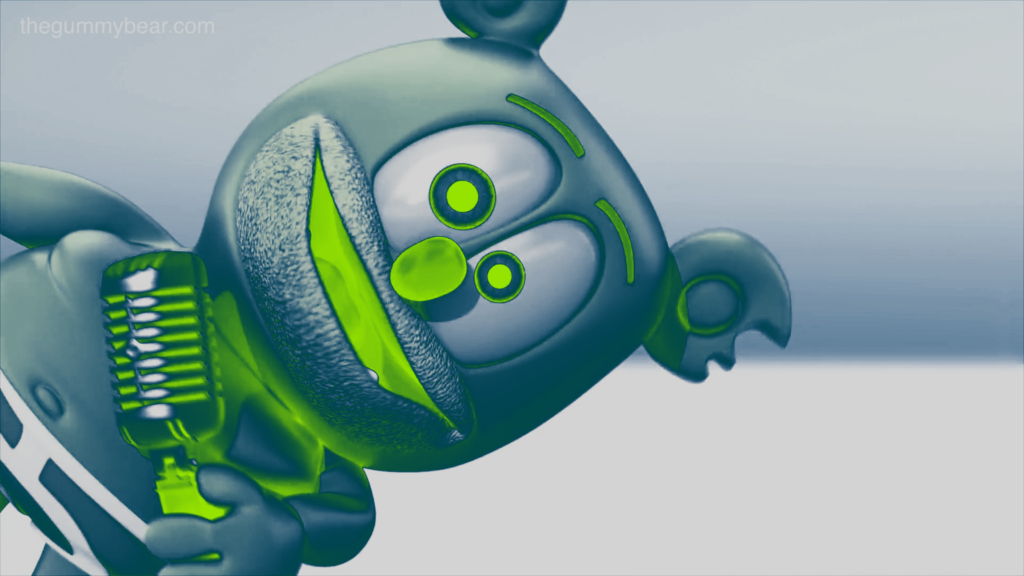
That’s it for the video effect, if you are using Gummy Bear as reference, it should look like this

Step 5:
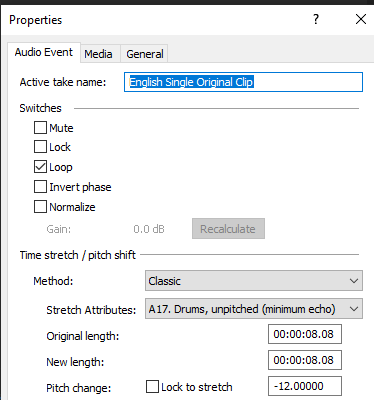
For the audio part, right click audio, then choose Properties.

Step 6:
In the popup window, change the following:
Method: Classic
Stretch Attributes: A17. Drums, unpitched (minimum echo)
Pitch Change: -12

Step 7:
Go to your audio again and right click it, then choose Duplicate track

Step 8:
Change the pitch of the new audio with the following:

Method: Classic
Stretch Attributes: A17. Drums, unpitched (minimum echo)
Pitch Change: 0.000

Step 9:
Do Step 7 and 8 two more times with the following pitches.

Method: Classic
Stretch Attributes: A17. Drums, unpitched (minimum echo)
Pitch Change: 5.00

Method: Classic
Stretch Attributes: A17. Drums, unpitched (minimum echo)
Pitch Change: 7.00

Step 10:
Render the video, you have successfully made the G Major 9 Effect.
Here are my videos in G Major 9 effect.

If you find this tutorial very helpful, please feel free to share it.
You can also find me in Youtube -> Team Bahay
How to do the G Major 8 effect in Vegas

In this tutorial, we will learn how to make G Major 8 in Vegas Application.

Step 1:
Open Vegas application, then import your video.

Import video

Step 2:
Go to video section and click fx symbol. As an alternate way, you can just right click the video and choose Media fx.

Click fx symbol

Step 3:
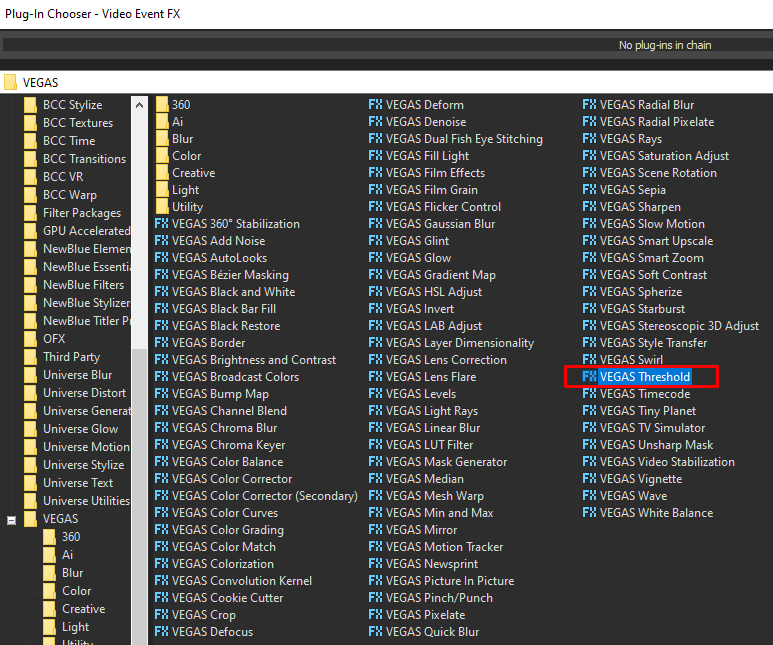
Choose Threshold in the list of effects.

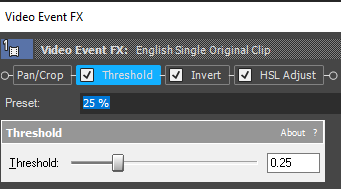
Step 4: In the list of Presets, choose 25%
Threshold -> 0.25

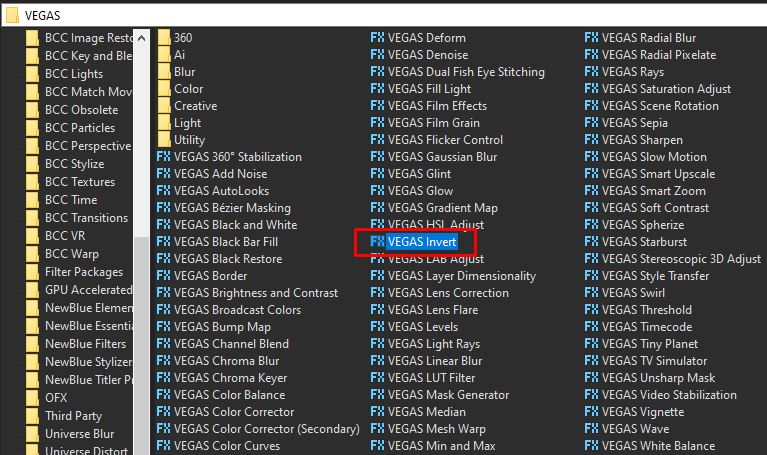
Step 5: Add 2nd effect Invert

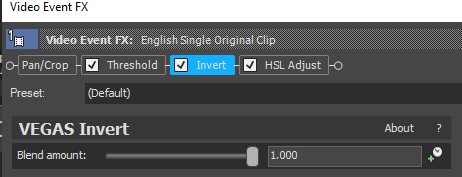
Step 6: In the list of Presets for Invert, choose Default.
Blend Amount: 1.000

Step 7: Add the 3rd effect HSL Adjust.

Step 8: In the list of Presets, choose Invert Color.
Add to hue -> 0.500

That’s it for the video effect, if you are using Gummy Bear as reference, it should look like this

Step 9:
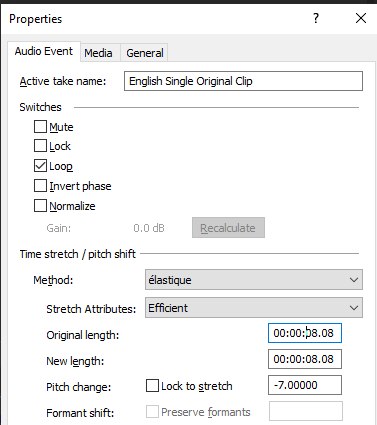
For the audio part, right click audio, then choose Properties.

Step 10:
In the popup window, change the following:
Method: elastique
Stretch Attributes: Efficient
Pitch Change: -7.000

Step 11:
Go to your audio again and right click it, then choose Duplicate track

Step 12:
Change the pitch of the new audio with the following:

Method: elastique
Stretch Attributes: Efficient
Pitch Change: 0.000

Step 13:
Render the video, you have successfully made the G Major 8 Effect.
Here is my video in G Major 8 effect.

If you find this tutorial very helpful, please feel free to share it.
You can also find me in Youtube -> Team Bahay

How to do the G Major 7 effect in Vegas

In this tutorial, we will learn how to make G Major 7 in Vegas Application.

Step 1:
Open Vegas application, then import your video.

Import video

Step 2:
Go to video section and click fx symbol. As an alternate way, you can just right click the video and choose Media fx.

Click fx symbol

Step 3:
Choose Invert in the list of effects.

Step 4:
A popup will appear, set Blend amount to 1.000. You can also pick Default in the list of available Preset.

If you are using Gummy Bear as a reference, the effect should look like this:

Step 5:
For the audio part, right click audio, then choose Properties.

Step 6:
In the popup window, change the following:
Method: Classic
Stretch Attributes: A17. Drums, unpitched (minimum echo)
Pitch Change: 3.000

Step 7:
Go to your audio again and right click it, then choose Duplicate track

Step 8:
Change the pitch of the new audio with the following:

Method: Classic
Stretch Attributes: A17. Drums, unpitched (minimum echo)
Pitch Change: 0.000

Step 9:
Render the video, you have successfully made the G Major 7 Effect.
Here is my video in G Major 7 effect.

If you find this tutorial very helpful, please feel free to share it.
You can also find me in Youtube -> Team Bahay