Tutorial – How to do the G Major 34 effect in Vegas

Gummy Bear in G Major 34

Today we will learn how to make “G Major 34” in Vegas Application.
If you don’t have a Sony Vegas, you can get it here -> Sony Vegas

Video

Step 1: Open Vegas application, then import your video.
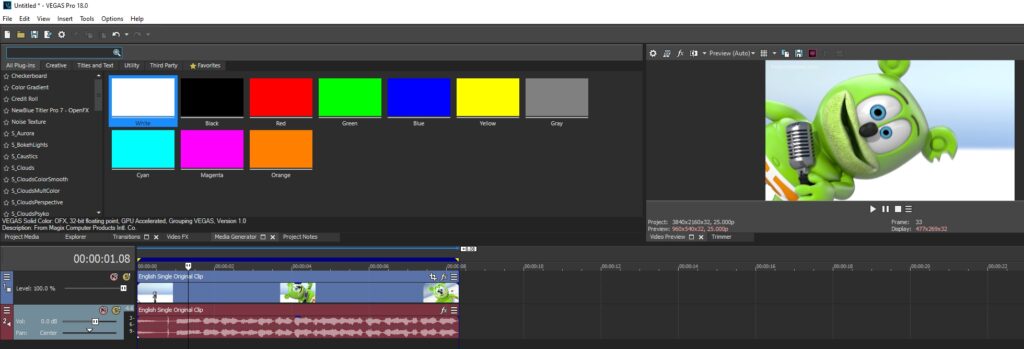
Import video

Step 2: Go to video section and click fx symbol. As an alternate way, you can just right click the video and choose Media fx.

Click fx symbol

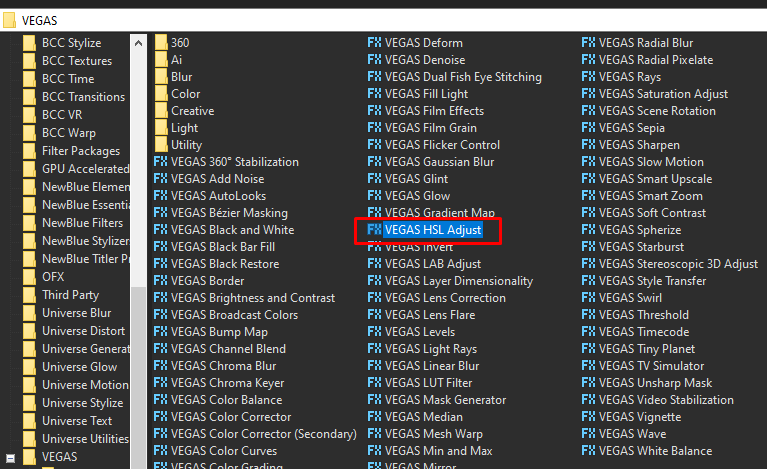
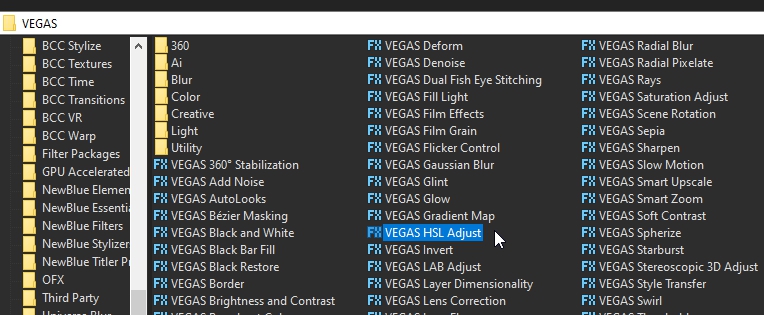
Step 3: Choose HSL Adjust in the list of effects.
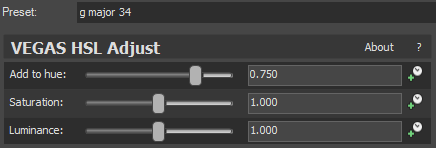
Step 4: In the window for HSL Adjust, set Hue to 0.750
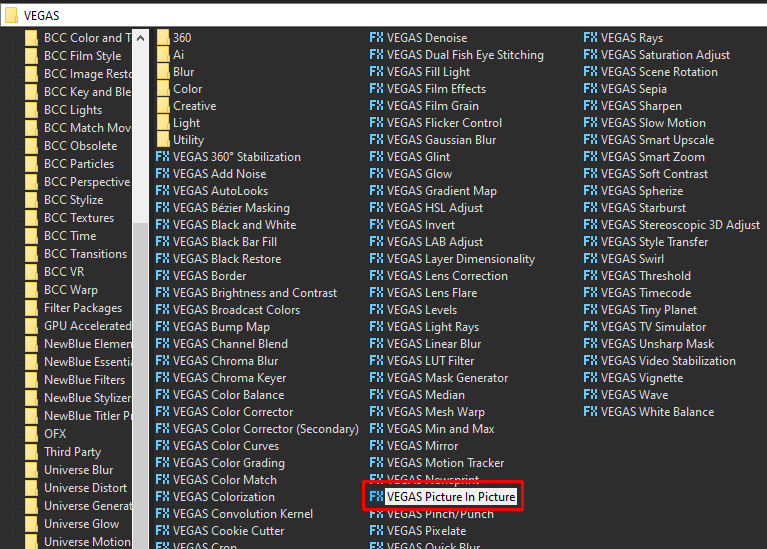
Step 5: Add the 2nd effect Picture in Picture.
Step 6: Set to Default Preset, then change the settings of the following:
Scale: 1.000
Angle: 180.000
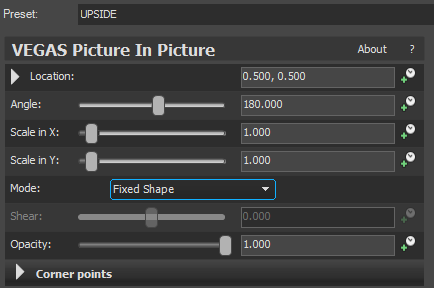
Note: Save this preset as this will be used in many video effects.

Step 7: For the 3rd video effect, add NewBlue ME Wiggle
Note: If you don’t have NewBlue Motion Effects, you can check it here – NEWBLUE Effects
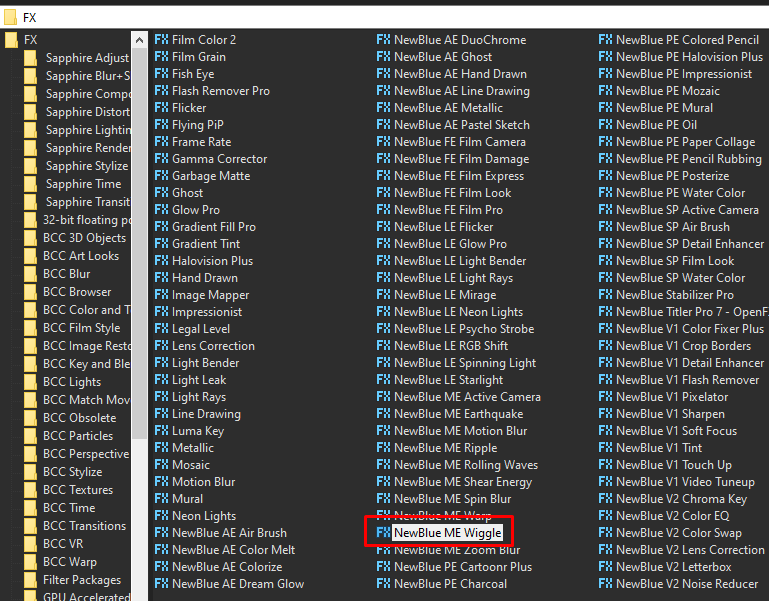
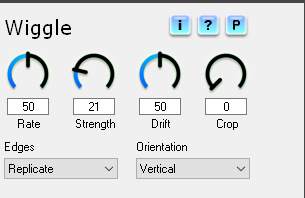
Step 8: Copy the settings below for NewBlue ME Wiggle.
Step 9: Add the 4th effect Picture in Picture.

Step 10: Set to Default Preset, then change the settings of the following:
Scale: 1.000
Angle: 180.000

Note: Save this preset as this will be used in many video effects.

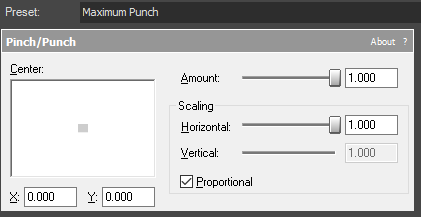
Step 11: For the 5th effect, add Pinch/Punch.
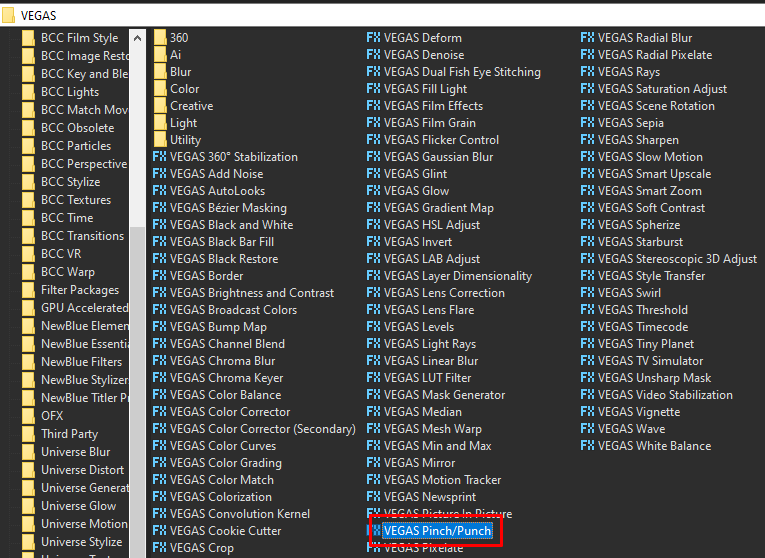
Step 12: Choose preset Maximum Punch in the list of presets
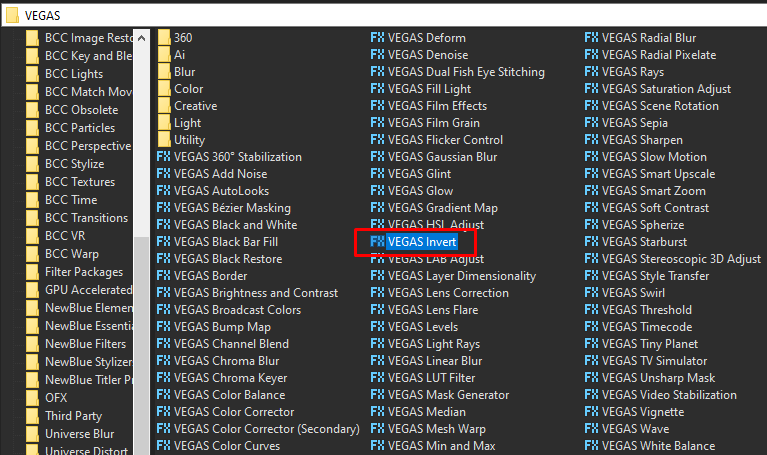
Step 13: Add the 6th video effect Invert.
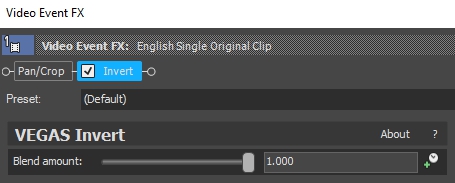
Step 14: In the list of Presets for Invert, choose Default.
Blend Amount: 1.000
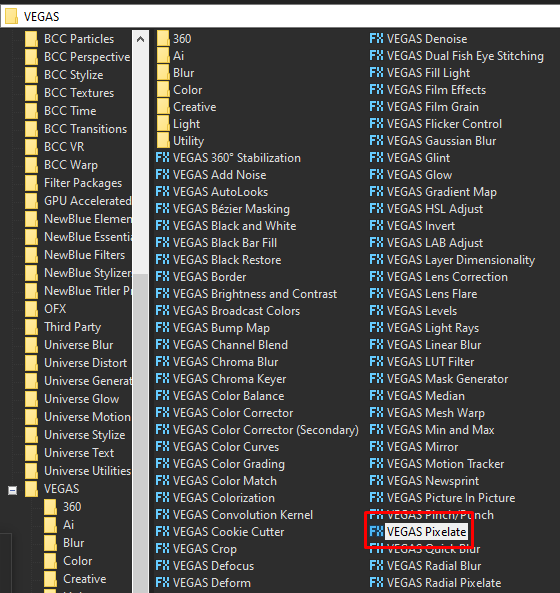
Step 15: For our last video effect, add Pixelate.
Step 16: Copy the settings below:
Horizontal Pixelization – 0.650
Vertical Pixelization – 0.650

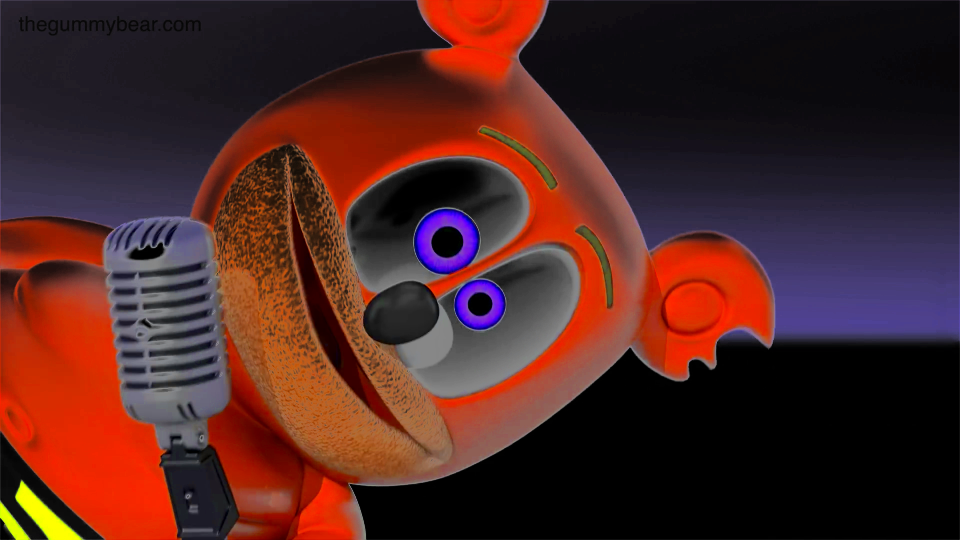
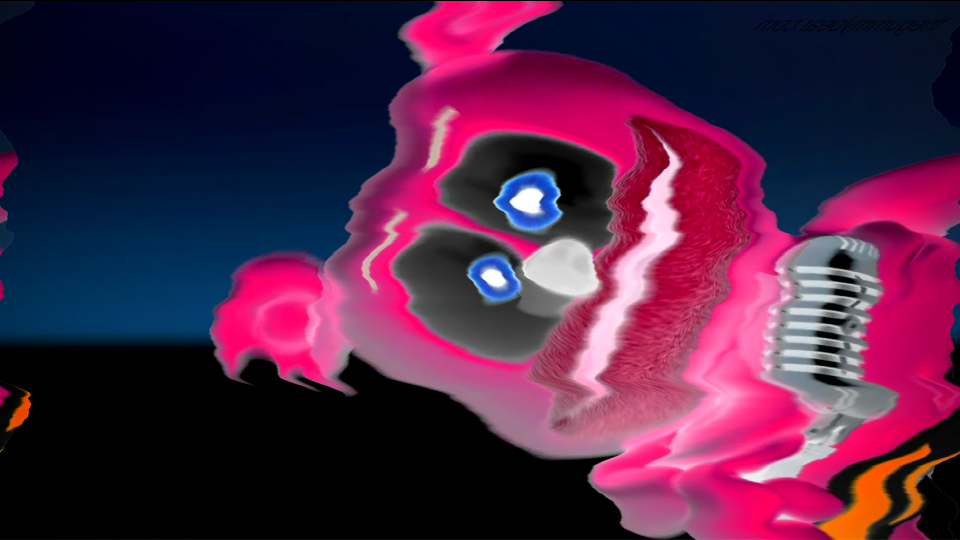
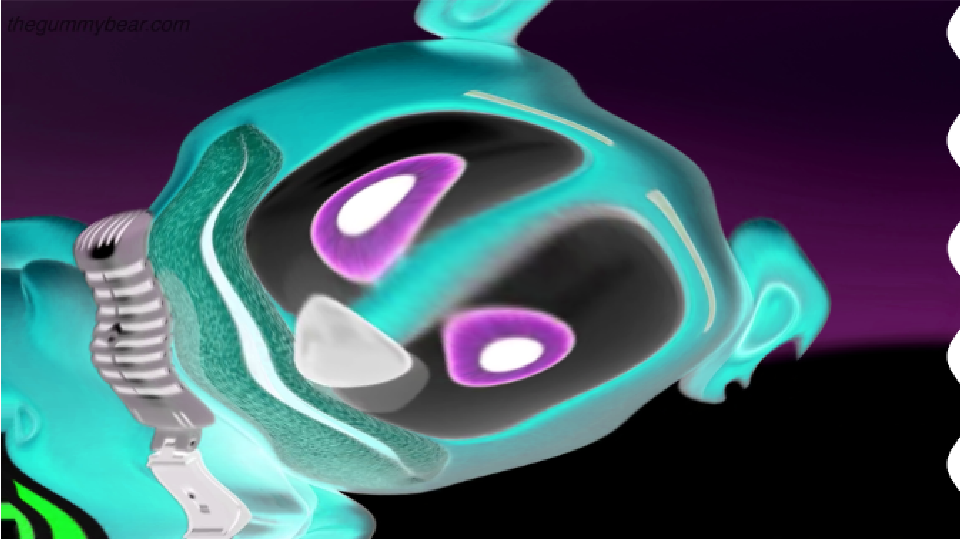
That’s it for the video effect, if you are using Gummy Bear as reference, it should look like this
Audio

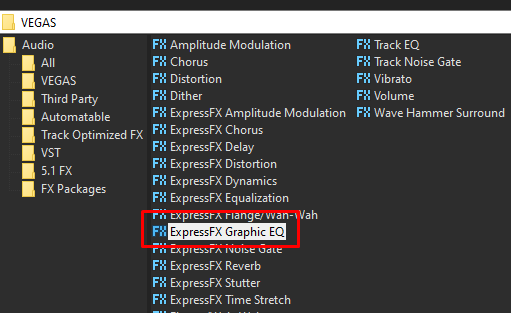
Step 17: For the audio part, add the effect ExpressFX Graphic EQ.
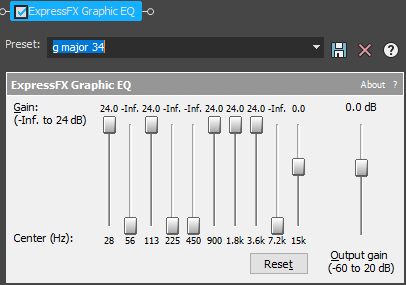
Step 18: Copy the settings below:
1st: 24.0 = 28
2nd: -Inf. = 56
3rd: 24.0 = 113
4th: -Inf. = 225
5th: -Inf. = 450
6th: 24.0 = 900
7th: 24.0 = 1.8k
8th: 24.0 = 3.6k
9th: -Inf. = 7.2k
10th: 0.0 = 15k
Output gain: 0.0 dB (-60 to 20 dB)
Step 19: After adding the audio effect, right click audio, then choose Properties.
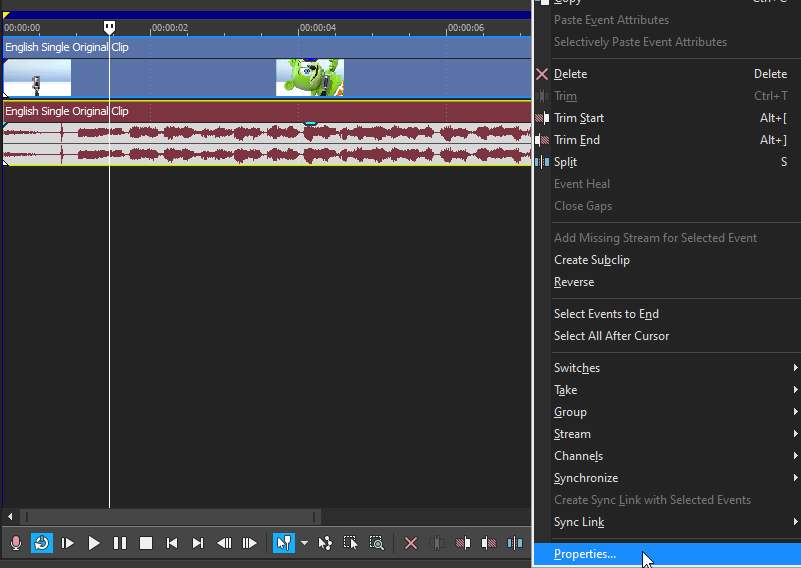
Audio track -> properties

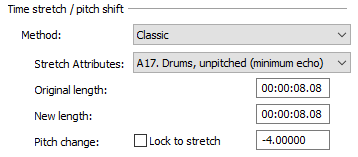
Step 20: In the popup window, change the following:
Method: Classic
Stretch Attributes: A17
Pitch Change: -4.000
Step 21:
Go to your audio again and right click it, then choose Duplicate track

Step 22:
Change the pitch of the new audio with the following:

Method: Classic
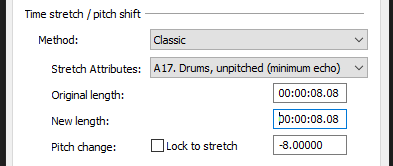
Stretch Attributes: A17. Drums, unpitched (minimum echo)
Pitch Change: 0.000

Step 23:
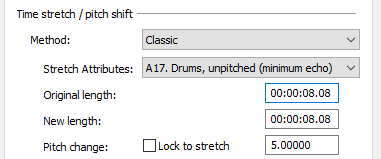
Do Step 21 and 22 for one more time with the following pitch.

Method: Classic
Stretch Attributes: A17. Drums, unpitched (minimum echo)
Pitch Change: 5.000

Step 24:
Render the video, you have successfully made the G Major 34 Effect.
Here is my video in G Major 34 effect.

If you find this tutorial very helpful, please feel free to share it.
You can also find me in Youtube -> Team Bahay
Here are the other tutorials -> Other G Major Effects

Tutorial – How to do the G Major 33 effect in Vegas

Today we will learn how to make “G Major 33” in Vegas Application.
If you don’t have a Sony Vegas, you can get it here -> Sony Vegas

Video

Step 1: Open Vegas application, then import your video.

Import video

Step 2: Go to video section and click fx symbol. As an alternate way, you can just right click the video and choose Media fx.

Click fx symbol

Step 3: Choose Invert in the list of effects.

Step 4: In the list of Presets for Invert, choose Default.
Blend Amount: 1.000

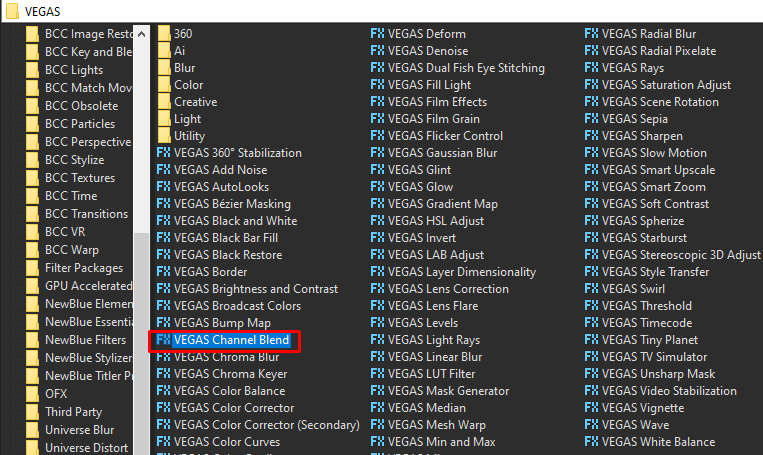
Step 5: Add the 2nd effect Channel Blend.

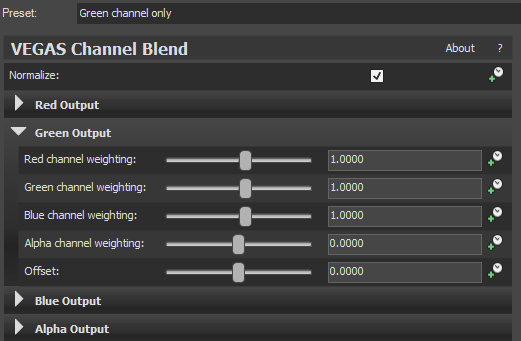
Step 6: In the list of Presets, choose Green channel only.

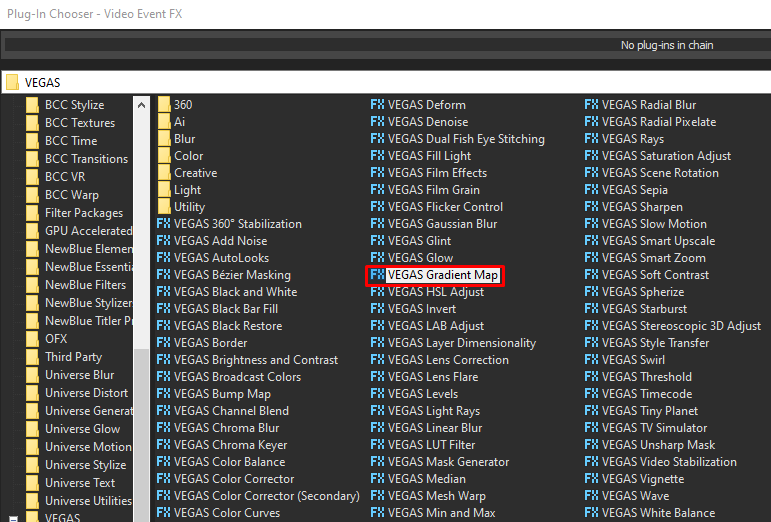
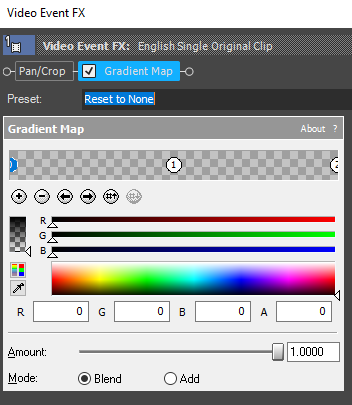
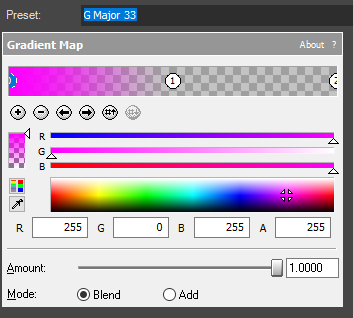
Step 7: For the 3rd video effect, add Gradient Map.

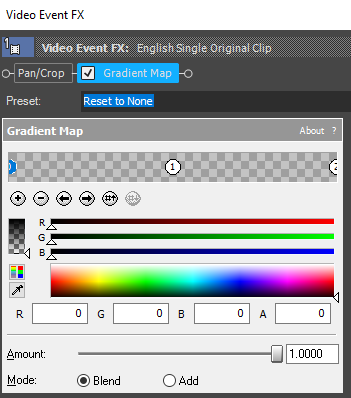
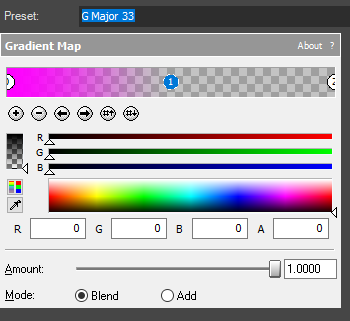
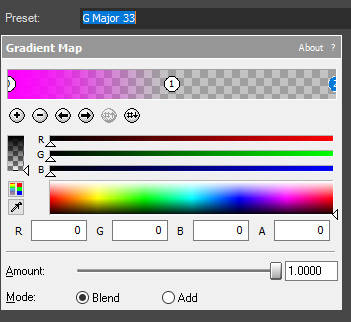
Step 8: Customize the gradients using the following settings

1st Gradient:

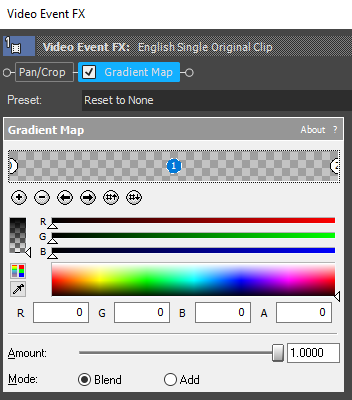
R -> 255G -> 0B -> 255A -> 255

2nd Gradient

R-> 0G -> 0B -> 0A -> 0

3rd Gradient

R-> 0G -> 0B -> 0A -> 0

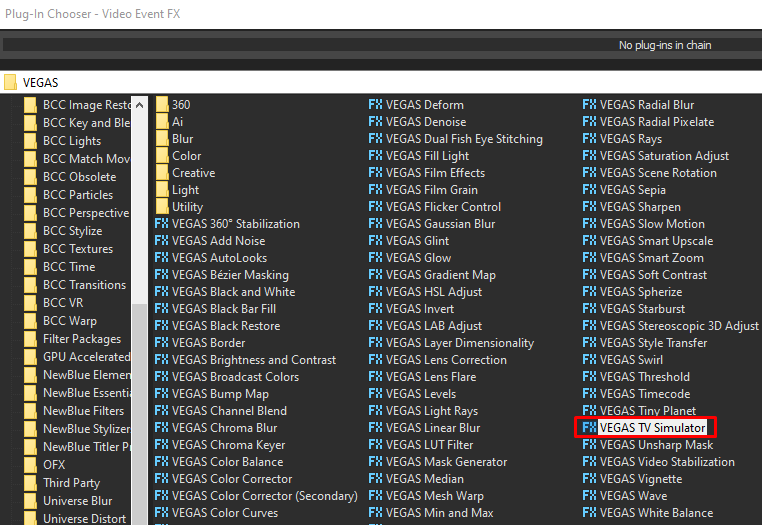
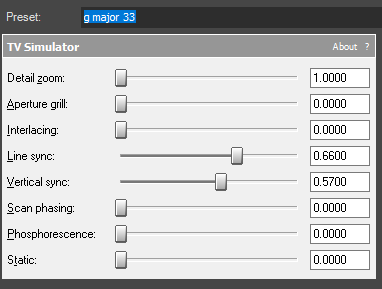
Step 9: For the last effect, choose TV Simulator.

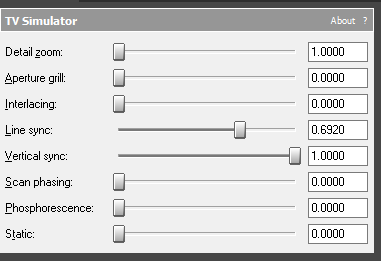
Step 10: Copy the settings in the image below.

That’s it for the video effect, if you are using Gummy Bear as reference, it should look like this

Audio

Step 11: For the audio part, right click audio, then choose Properties.

Audio track -> properties

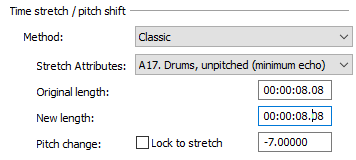
Step 12: In the popup window, change the following:
Method: Classic
Stretch Attributes: A17
Pitch Change: -7.000

Step 13:
Go to your audio again and right click it, then choose Duplicate track

Step 14:
Change the pitch of the new audio with the following:

Method: Classic
Stretch Attributes: A17. Drums, unpitched (minimum echo)
Pitch Change: 0.000

Step 15:
Do Step 13 and 14 for two more times with the following pitch.

Method: Classic
Stretch Attributes: A17. Drums, unpitched (minimum echo)
Pitch Change: 4.500

Method: Classic
Stretch Attributes: A17. Drums, unpitched (minimum echo)
Pitch Change: 8.670

Step 16:
Render the video, you have successfully made the G Major 33 Effect.
Here is my video in G Major 33 effect.

If you find this tutorial very helpful, please feel free to share it.
You can also find me in Youtube -> Team Bahay
Here are the other tutorials -> Other G Major Effects

Tutorial – How to do the G Major 32 effect in Vegas

Today we will learn how to make “G Major 32” in Vegas Application.
If you don’t have a Sony Vegas, you can get it here -> Sony Vegas

Video

Step 1: Open Vegas application, then import your video.

Import video

Step 2: Go to video section and click fx symbol. As an alternate way, you can just right click the video and choose Media fx.

Click fx symbol

Step 3: Choose Invert in the list of effects.

Step 4: In the list of Presets for Invert, choose Default.
Blend Amount: 1.000

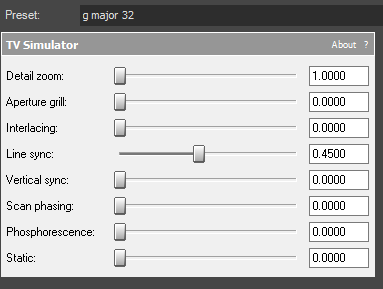
Step 5: Add TV Simulator for the 2nd effect.

Step 6: Copy the settings in the image below.

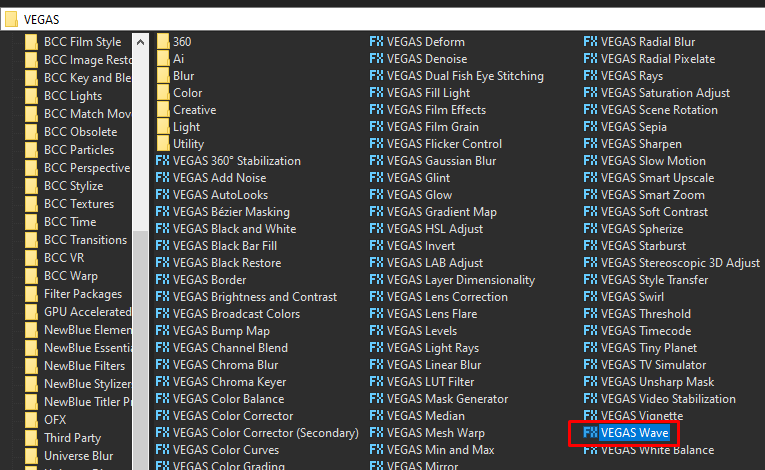
Step 7: For the next effect, add Wave.

Wave Effect

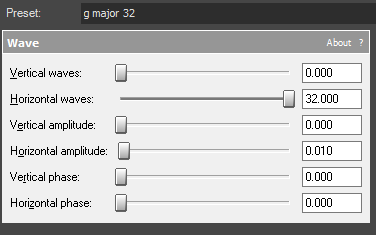
Step 8:
In the window for Wave, change it and follow the settings below.

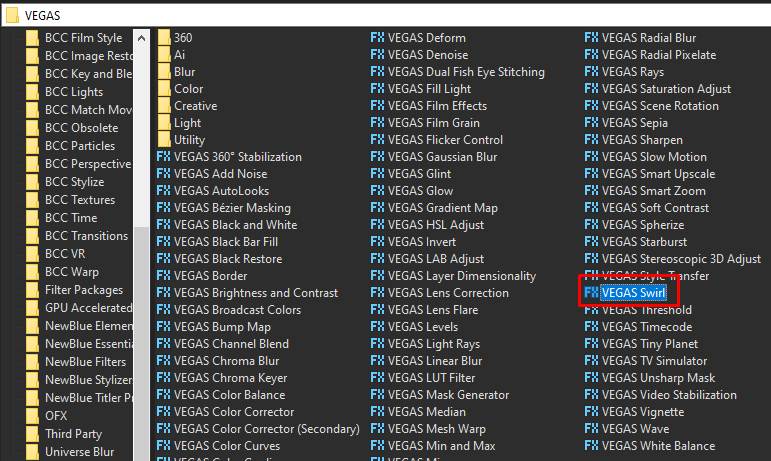
Step 9: Add the 4th effect Swirl.

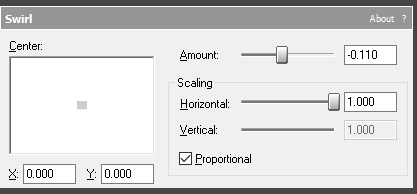
Step 10: In the window for Swirl, set the Amount to -0.110
Amount -> -0.110

Step 11: Add another Swirl effect for the 5th video effect.

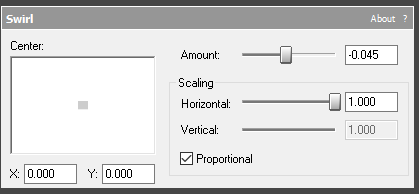
Step 12: In the window for Swirl, set the Amount to -0.045
Amount -> -0.045

Step 13: Last and final effect is Invert.

Step 14: In the list of Presets for Invert, choose Default.
Blend Amount: 1.000

That’s it for the video effect, if you are using Gummy Bear as reference, it should look like this

Audio

Step 15: For the audio part, right click audio, then choose Properties.

Audio track -> properties

Step 16: In the popup window, change the following:
Method: Classic
Stretch Attributes: A17
Pitch Change: -8.000

Step 17:
Go to your audio again and right click it, then choose Duplicate track

Step 18:
Change the pitch of the new audio with the following:

Method: Classic
Stretch Attributes: A17. Drums, unpitched (minimum echo)
Pitch Change: -6.000

Step 19:
Do Step 17 and 18 for two more times with the following pitch.

Method: Classic
Stretch Attributes: A17. Drums, unpitched (minimum echo)
Pitch Change: -3.000

Method: Classic
Stretch Attributes: A17. Drums, unpitched (minimum echo)
Pitch Change: 0.000

Step 20:
Render the video, you have successfully made the G Major 32 Effect.
Here is my video in G Major 32 effect.

If you find this tutorial very helpful, please feel free to share it.
You can also find me in Youtube -> Team Bahay
Here are the other tutorials -> Other G Major Effects
Tutorial – How to do the G Major 31 effect in Vegas

Today we will learn how to make “G Major 31” in Vegas Application.
If you don’t have a Sony Vegas, you can get it here -> Sony Vegas

Video

Step 1: Open Vegas application, then import your video.

Import video

Step 2: Go to video section and click fx symbol. As an alternate way, you can just right click the video and choose Media fx.

Click fx symbol

Step 3: Choose HSL Adjust in the list of effects.

Step 4: In the window for HSL Adjust, set Hue to 0.275

Step 5: Add the 2nd effect Invert.

Step 6: In the list of Presets for Invert, choose Default.
Blend Amount: 1.000

Step 7: For the 3rd effect, add Gradient Map.

Step 8:
Customize the gradients using the following settings.
1st Gradient:

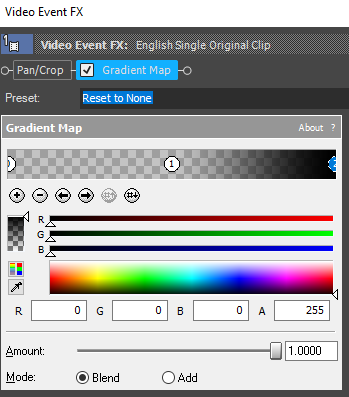
R -> 0G -> 0B -> 0A -> 0

2nd Gradient

R-> 0G -> 0B -> 0A -> 0

3rd Gradient

R-> 0G -> 0B -> 0A -> 255

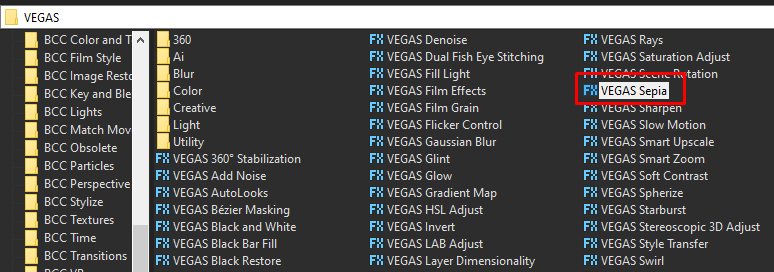
Step 9: For the last effect, add Sepia.

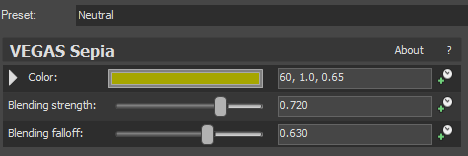
Step 10: Use the Preset for Neutral.

That’s it for the video effect, if you are using Gummy Bear as reference, it should look like this

Audio

Step 11: For the audio part, right click audio, then choose Properties.

Audio track -> properties

Step 12: In the popup window, change the following:
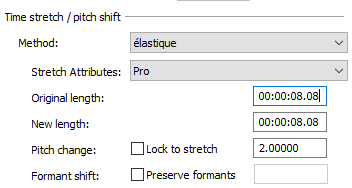
Method: elastique
Stretch Attributes: Pro
Pitch Change: 2.00

Step 13: Go to your audio again and right click it, then choose Duplicate track

Step 14: Change the pitch of the new audio with the following:

Method: elastique
Stretch Attributes: Pro
Pitch Change: 6.00

Step 15: Render the video, you have successfully made the G Major 31 Effect.
Here is my video with G Major 31 effect.

If you find this tutorial very helpful, please feel free to share it.
You can also find me in Youtube -> Team Bahay
Here are the other tutorials -> Other G Major Effects
Tutorial – How to do the G Major 30 effect in Vegas

Today we will learn how to make “G Major 30” in Vegas Application.
If you prefer a video tutorial, you can just go to this link -> Youtube G MAJOR 30 Tutorial.
No Sony Vegas? You can get it here -> Sony Vegas.

Video

Step 1: Open Vegas application, then import your video.

Import video

Step 2: Go to video section and click fx symbol. As an alternate way, you can just right click the video and choose Media fx.

Click fx symbol

Step 3: Choose Invert in the list of effects.

Step 4: In the list of Presets for Invert, choose Default.
Blend Amount: 1.000

Step 5: Add 2nd effect HSL Adjust.

HSL ADJUST

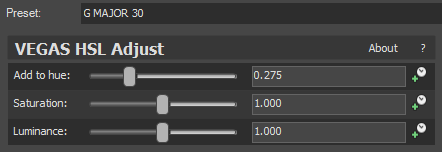
Step 6: Follow the settings below for HSL Adjust effect.

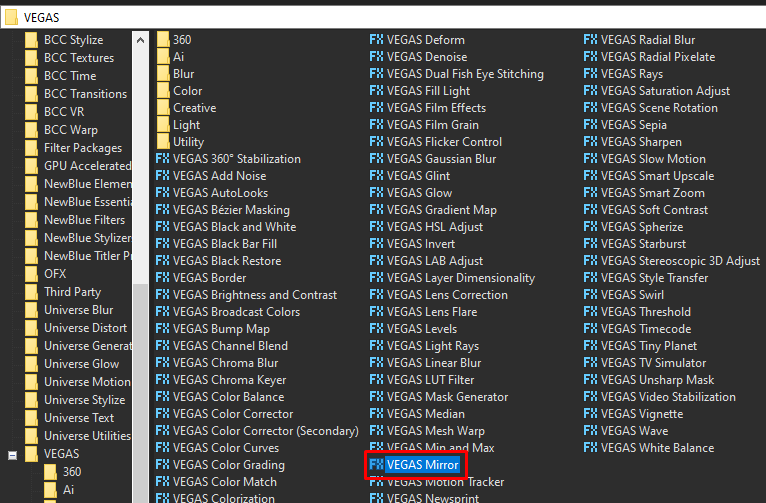
Step 7: For the 3rd effect, add Mirror.

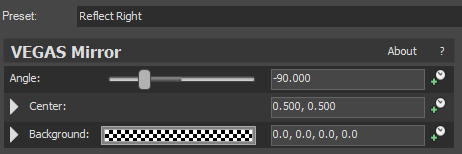
Step 8: Choose Reflect Right in the list of presets.

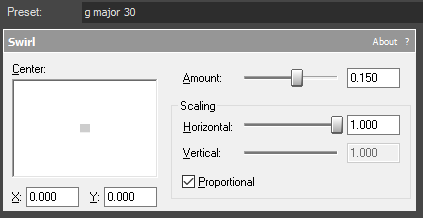
Step 9: Add the 4th effect Swirl.

Step 10: In the window for Swirl, set the Amount to 0.150
Amount -> 0.150

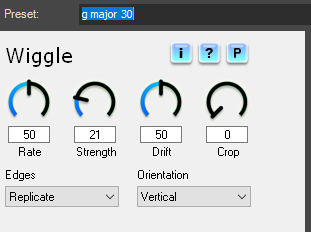
Step 11: For our final and last video effect, add NewBlue ME Wiggle
Note: If you don’t have NewBlue Motion Effects, you can check it here – NEWBLUE Effects

Step 12: Copy the settings below for NewBlue ME Wiggle.

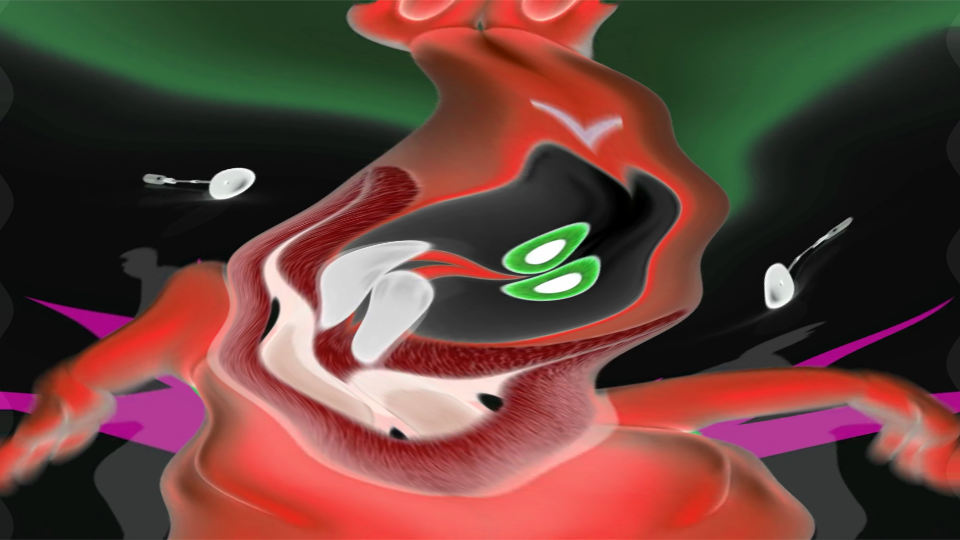
That’s it for the video effect, if you are using Gummy Bear as reference, it should look like this

Audio

Step 13: For the audio part, right click audio, then choose Properties.

Audio track -> properties

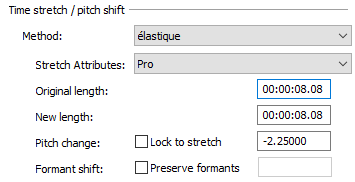
Step 14: In the popup window, change the following:
Method: elastique
Stretch Attributes: Pro
Pitch Change: -2.25

Step 15: Go to your audio again and right click it, then choose Duplicate track

Step 16: Change the pitch of the new audio with the following:

Method: elastique
Stretch Attributes: Pro
Pitch Change: 0.00

Step 17: Render the video, you have successfully made the G Major 30 Effect.
Here is my video with G Major 30 effect.

If you find this tutorial very helpful, please feel free to share it.
You can also find me in Youtube -> Team Bahay
Here are the other tutorials -> Other G Major Effects

Tutorial – How to do the G Major 29 effect in Vegas

Today we will learn how to make “G Major 29” in Vegas Application.
If you prefer a video tutorial, you can just go to this link -> Youtube G MAJOR 29 Tutorial.
If you don’t have a Sony Vegas, you can get it here -> Sony Vegas.

Video

Step 1: Open Vegas application, then import your video.

Import video

Step 2: Go to video section and click fx symbol. As an alternate way, you can just right click the video and choose Media fx.

Click fx symbol

Step 3: Choose Gradient Map in the list of effects.

Step 4: Customize the gradients using the following settings.
1st Gradient:

R -> 0G -> 0B -> 0A -> 0

2nd Gradient

R-> 0G -> 0B -> 0A -> 0

3rd Gradient

R-> 0G -> 0B -> 0A -> 255

Step 5: Add the 2nd effect Channel Blend.

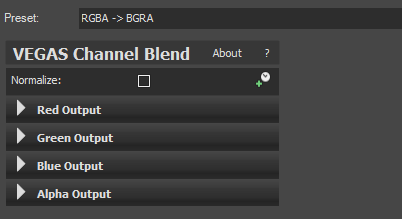
Step 6: In the list of Presets, choose RGBA -> BGRA

Step 7: Add HSL Adjust for the last video effect.

Step 8: Copy the settings below.

That’s it for the video effect, if you are using Gummy Bear as reference, it should look like this

Audio

Step 9: For the audio part, right click audio, then choose Properties.

Audio track -> properties

Step 10: In the popup window, change the following:
Method: Classic
Stretch Attributes: A17
Pitch Change: 5.000

Step 11:
Go to your audio again and right click it, then choose Duplicate track

Step 12:
Change the pitch of the new audio with the following:

Method: Classic
Stretch Attributes: A17. Drums, unpitched (minimum echo)
Pitch Change: 7.000

Step 13:
Do Step 11 and 12 for one more time with the following pitch.

Method: Classic
Stretch Attributes: A17. Drums, unpitched (minimum echo)
Pitch Change: 9.000

Step 14:
Render the video, you have successfully made the G Major 29 Effect.
Here are my videos in G Major 29 effect.

If you find this tutorial very helpful, please feel free to share it.
You can also find me in Youtube -> Team Bahay
Here are the other tutorials -> Other G Major Effects
Tutorial – How to do the G Major 28 effect in Vegas

Today we will learn how to make G Major 28 in Vegas Application.
If you don’t have a Sony Vegas, you can get it here -> Sony Vegas.

Video

Step 1: Open Vegas application, then import your video.

Import video

Step 2: Go to video section and click fx symbol. As an alternate way, you can just right click the video and choose Media fx.

Click fx symbol

Step 3: Choose Invert in the list of effects.

Step 4: In the list of Presets for Invert, choose Default.
Blend Amount: 1.000

Step 5: Add the 2nd effect Channel Blend.

Step 6: In the list of Presets, choose RGBA -> BGRA

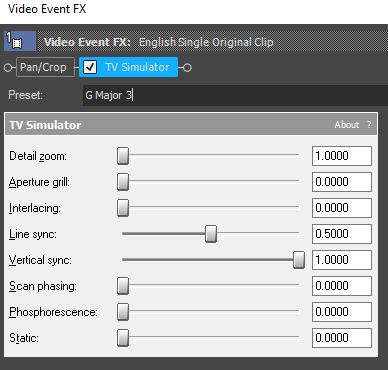
Step 7: Add TV Simulator for the 3rd effect.

Step 8: Copy the settings in the image below.

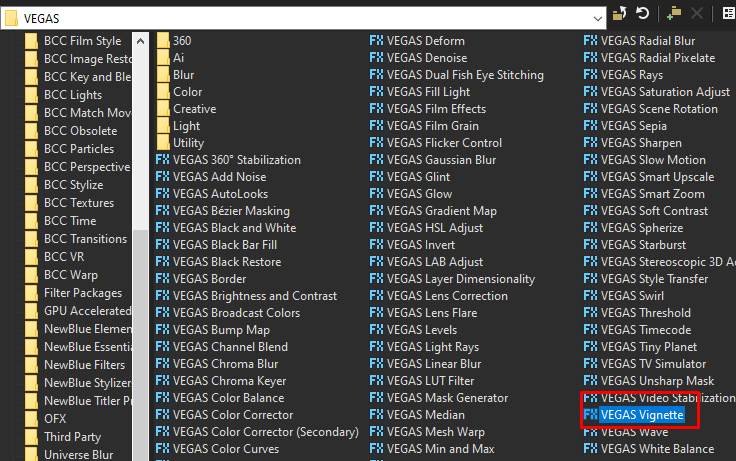
Step 9: Add Vignette for the 4th effect.

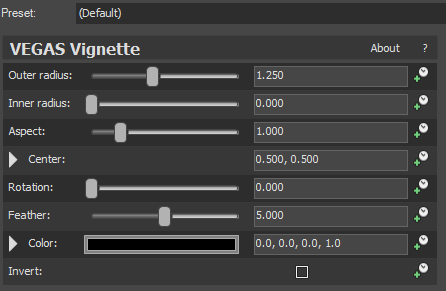
Step 10: After setting to Default Preset, change Outer radius to 1.250.

Step 11: Add HSL Adjust for the last video effect.

Step 12: Copy the settings below.

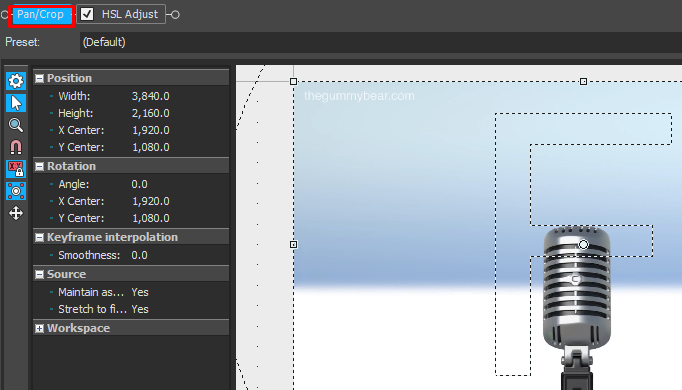
Step 13: And lastly, flip your video horizontally. Go to Pan/Crop which you can see as the default and 1st effect in your Video Event FX.

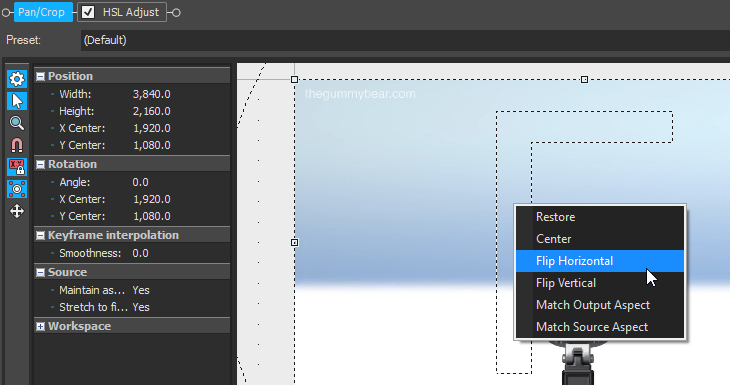
Step 14: Right click anywhere in the video preview, and choose Flip Horizontal.


That’s it for the video effect, if you are using Gummy Bear as reference, it should look like this

Audio

Step 15: For the audio part, right click audio, then choose Properties.

Step 16: In the popup window, change the following:
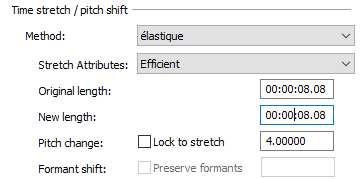
Method: elastique
Stretch Attributes: Efficient
Pitch Change: 4.0000

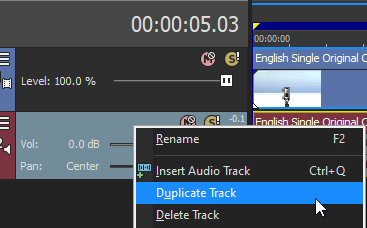
Step 17: Go to your audio again and right click it, then choose Duplicate track

Step 18: Change the pitch of the new audio with the following:

Method: elastique
Stretch Attributes: Efficient
Pitch Change: 5.0000

Step 19: Do Step 17 and 18 one more time with the following pitches
Method: elastique
Stretch Attributes: Efficient
Pitch Change: 6.0000

Step 20: Render the video, you have successfully made the G Major 28 Effect.
Here is my video in G Major 28 effect.

If you find this tutorial very helpful, please feel free to share it.
You can also find me in Youtube -> Team Bahay
Here are the other tutorials -> Other G Major Effects
Tutorial – How to do the G Major 27 effect in Vegas

Today we will learn how to make “G Major 27” in Vegas Application.
If you don’t have a Sony Vegas, you can get it here -> Sony Vegas.

Video

Step 1: Open Vegas application, then import your video.

Import video

Step 2: Go to video section and click fx symbol. As an alternate way, you can just right click the video and choose Media fx.

Click fx symbol

Step 3: Choose TV Simulator in the list of effects.

Step 4:
Copy the settings in the image below.

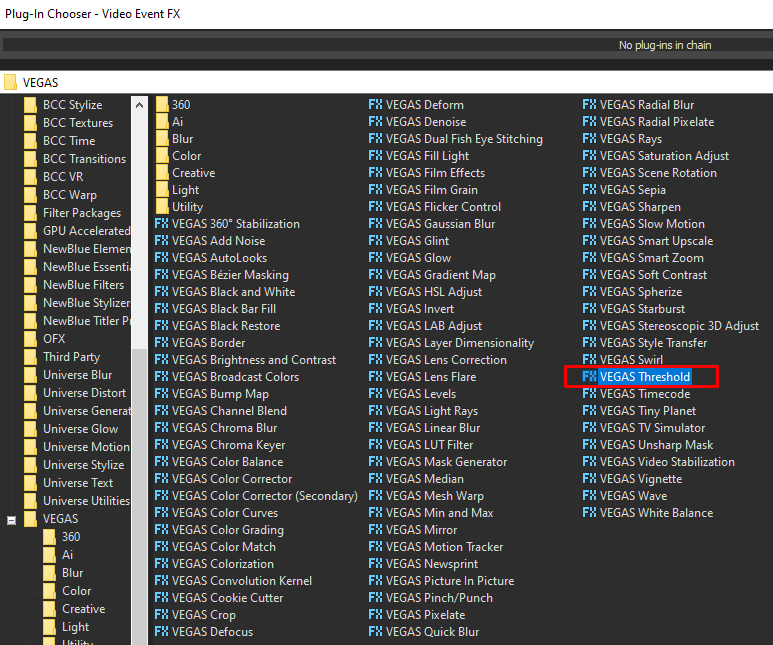
Step 5: Add Threshold for the 2nd effect.

Step 6: Set the Threshold to 0.36 or 36%.

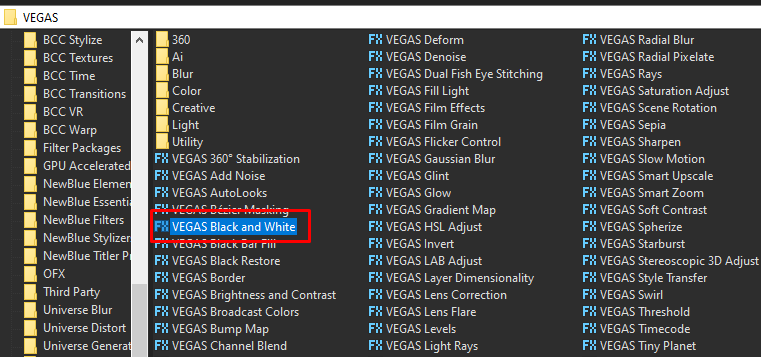
Step 7: Add the 3rd effect Black and White.

Step 8: Set the Blend amount to 1.000, or you just choose the Default preset.

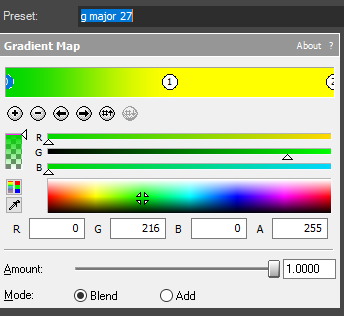
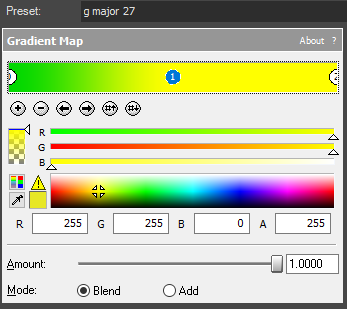
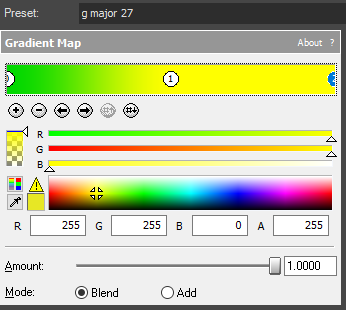
Step 9: For the last video effect, add Gradient Map.

Step 10: Customize the gradients using the following settings

1st Gradient:

R -> 0G -> 216B -> 0A -> 255

2nd Gradient

R-> 255G -> 255B -> 0A -> 255

3rd Gradient

R-> 255G -> 255B -> 0A -> 255

That’s it for the video effect, if you are using Gummy Bear as reference, it should look like this

Audio

Step 11: For the audio part, right click audio, then choose Properties.

Audio track -> properties

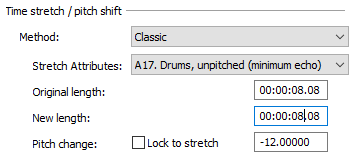
Step 12: In the popup window, change the following:
Method: Classic
Stretch Attributes: A17
Pitch Change: -12.000

Step 13:
Go to your audio again and right click it, then choose Duplicate track

Step 14:
Change the pitch of the new audio with the following:

Method: Classic
Stretch Attributes: A17. Drums, unpitched (minimum echo)
Pitch Change: -8.000

Step 15:
Do Step 13 and 14 for eight more times with the following pitches.

Method: Classic
Stretch Attributes: A17. Drums, unpitched (minimum echo)
Pitch Change: -5.000

Method: Classic
Stretch Attributes: A17. Drums, unpitched (minimum echo)
Pitch Change: 0.000

Method: Classic
Stretch Attributes: A17. Drums, unpitched (minimum echo)
Pitch Change: 2.000

Method: Classic
Stretch Attributes: A17. Drums, unpitched (minimum echo)
Pitch Change: 3.000

Method: Classic
Stretch Attributes: A17. Drums, unpitched (minimum echo)
Pitch Change: 4.000

Method: Classic
Stretch Attributes: A17. Drums, unpitched (minimum echo)
Pitch Change: 4.000

Method: Classic
Stretch Attributes: A17. Drums, unpitched (minimum echo)
Pitch Change: 6.000

Method: Classic
Stretch Attributes: A17. Drums, unpitched (minimum echo)
Pitch Change: 7.000

Step 16:
Render the video, you have successfully made the G Major 27 Effect.
Here is my video in G Major 27 effect.

If you find this tutorial very helpful, please feel free to share it.
You can also find me in Youtube -> Team Bahay
Here are the other tutorials -> Other G Major Effects
How to do the G Major 26 effect in Vegas

Today we will learn how to make “G Major 26” in Vegas Application.
If you don’t have a Sony Vegas, you can get it here -> Sony Vegas

Video

Step 1: Open Vegas application, then import your video.

Import video

Step 2: Go to video section and click fx symbol. As an alternate way, you can just right click the video and choose Media fx.

Click fx symbol

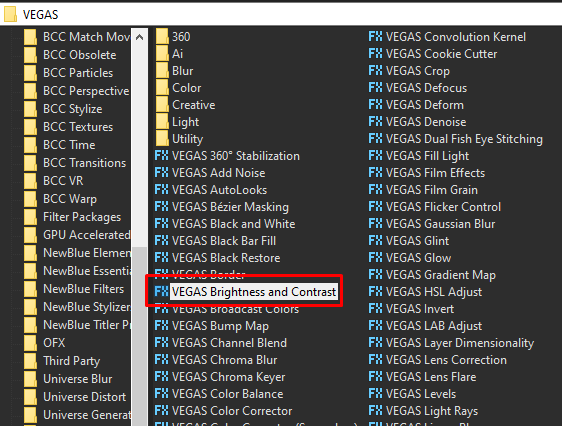
Step 3: Choose Brightness and Contrast in the list of effects.

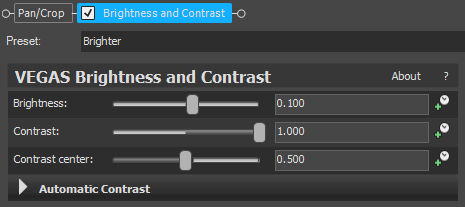
Step 4: In the window for Brightness and Contrast, select Preset Brighter, and change Contrast to 1.000

Step 5: Add HSL Adjust for the 2nd effect.

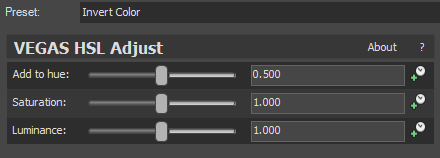
Step 6: Choose Invert Color in the list of presets, or copy the settings below if you don’t have that preset.
Change Add to Hue -> 0.5000

That’s it for the video effect, if you are using Gummy Bear as reference, it should look like this

Audio

Step 7: For the audio part, right click audio, then choose Properties.

Audio track -> properties

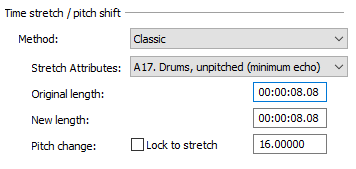
Step 8: In the popup window, change the following:
Method: Classic
Stretch Attributes: A17
Pitch Change: 16.000

Step 9: Render the video, you have successfully made the G Major 26 Effect.
Here is my video with G Major 26 effect.

If you find this tutorial very helpful, please feel free to share it.
You can also find me in Youtube -> Team Bahay
Here are the other tutorials -> Other G Major Effects
How to do the G Major 25 effect in Vegas
Today we will learn how to make “G Major 25” in Vegas Application.
If you prefer a video tutorial, you can just go to this link -> Youtube G Major 25 Tutorial
If you don’t have a Sony Vegas, you can get it here -> Sony Vegas

Video

Step 1: Open Vegas application, then import your video.

Import video

Step 2: Go to video section and click fx symbol. As an alternate way, you can just right click the video and choose Media fx.

Click fx symbol

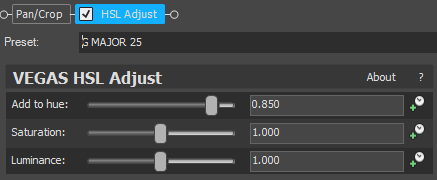
Step 3: Choose HSL Adjust in the list of effects.

Step 4: In the window for HSL Adjust, set Hue to 0.850

That’s it for the video effect, if you are using Gummy Bear as reference, it should look like this

Audio

Step 5: For the audio part, right click audio, then choose Properties.

Audio track -> properties

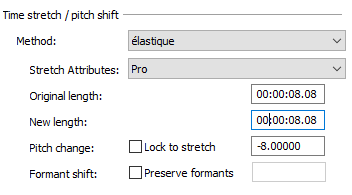
Step 6: In the popup window, change the following:
Method: elastique
Stretch Attributes: Pro
Pitch Change: -8.000

Step 7: Go to your audio again and right click it, then choose Duplicate track

Step 8: Change the pitch of the new audio with the following:

Method: elastique
Stretch Attributes: Pro
Pitch Change: -1.000

Step 9: Render the video, you have successfully made the G Major 25 Effect.
Here are my videos with G Major 25 effect.

If you find this tutorial very helpful, please feel free to share it.
You can also find me in Youtube -> Team Bahay
Here are the other tutorials -> Other G Major Effects